
Connecting Apache Airflow to Salesforce
Last updated: 06/29/2026
When a company or a business uses Salesforce for CRM (Customer Relationship Management), it has one or several orgs.
[...] A Salesforce org is your business’s dedicated workspace within Salesforce. It is a customizable digital environment where your business teams manage customer relationships and automated workflows while securely storing business data and service records.
> Smart IT Staff - Salesforce Org Types: Guide to Understanding Which One to Choose and When
There are different types of Salesforce orgs, which are listed and explained here. In the context of the proof of concept, the type of org used is a sandbox, which was populated with mock data for testing purposes.
Before an Apache Airflow environment can interact with the data stored in a Salesforce org, a connection must be established. This process involves two separate steps :
- Configuring the Salesforce org to receive and accept connections coming from external applications
- Connecting the Apache Airflow environment to the Salesforce org
On Apache Airflow, the connection mechanism is simple and only slightly changes from one connection type to another. On Salesforce, the configuration process involves multiple steps and can be complex at times.
This page details the two steps listed above and shows how the Apache Airflow environment and the Salesforce sandbox used in the proof of concept were configured.
Configuring a Salesforce org to receive external connections
On Salesforce, the mechanism to connect third-party applications to orgs is called 'External Client Apps'. There is a second mechanism called 'Connected Apps', but it is restricted as of Spring '26—existing Connected Apps still work but it is not possible to create new ones.
The goal of an External Client App is, as its name implies, to authorize external applications to access specific data and perform predefined actions on a Salesforce org using API calls.
The first step in configuring a Salesforce org to receive external connections is to create a new External Client App within that org.
Creating a new External Client App
The Salesforce documentation to create a new External Client App can be found here.
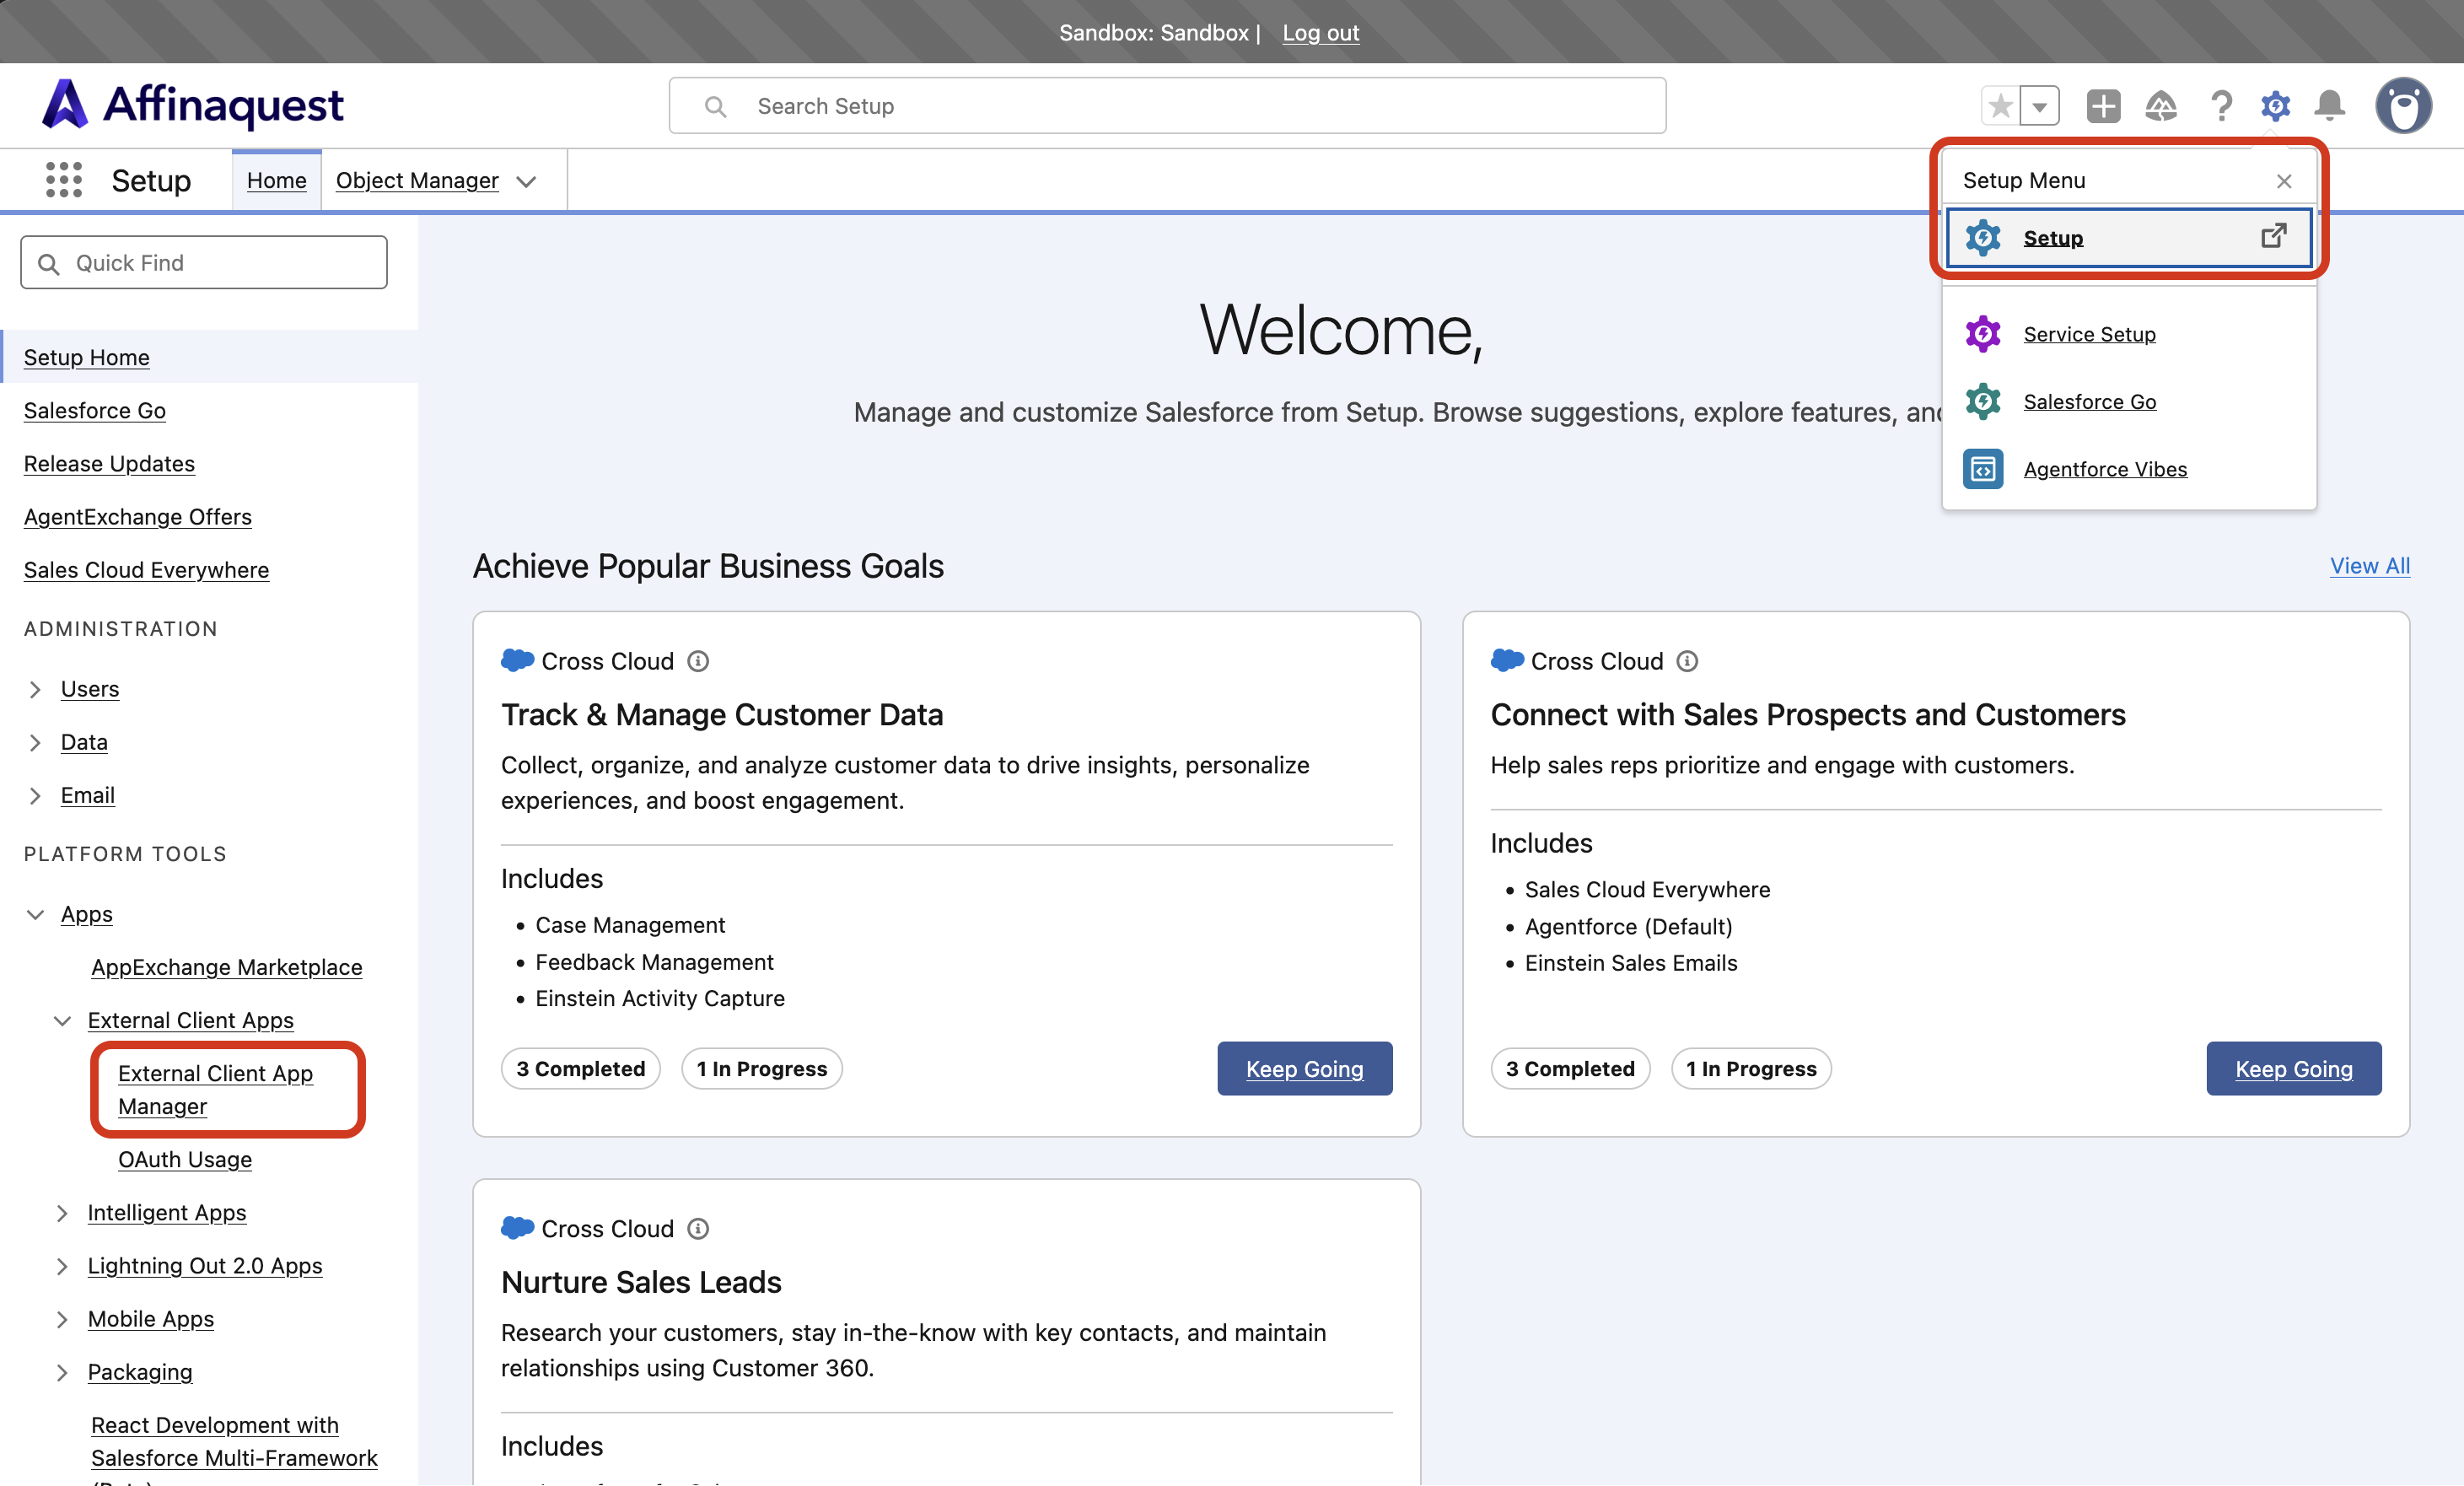
External Client Apps are managed from the 'Setup' section of Salesforce. When connected to a Salesforce org, this section can be accessed by clicking on the bolt icon located in the top-right corner of the dashboard and then clicking on 'Setup'. Once in the 'Setup' section, the External Client App Manager is located on the left panel, under 'Platform Tools' > 'Apps' > 'External Client Apps' > 'External Client App Manager'.
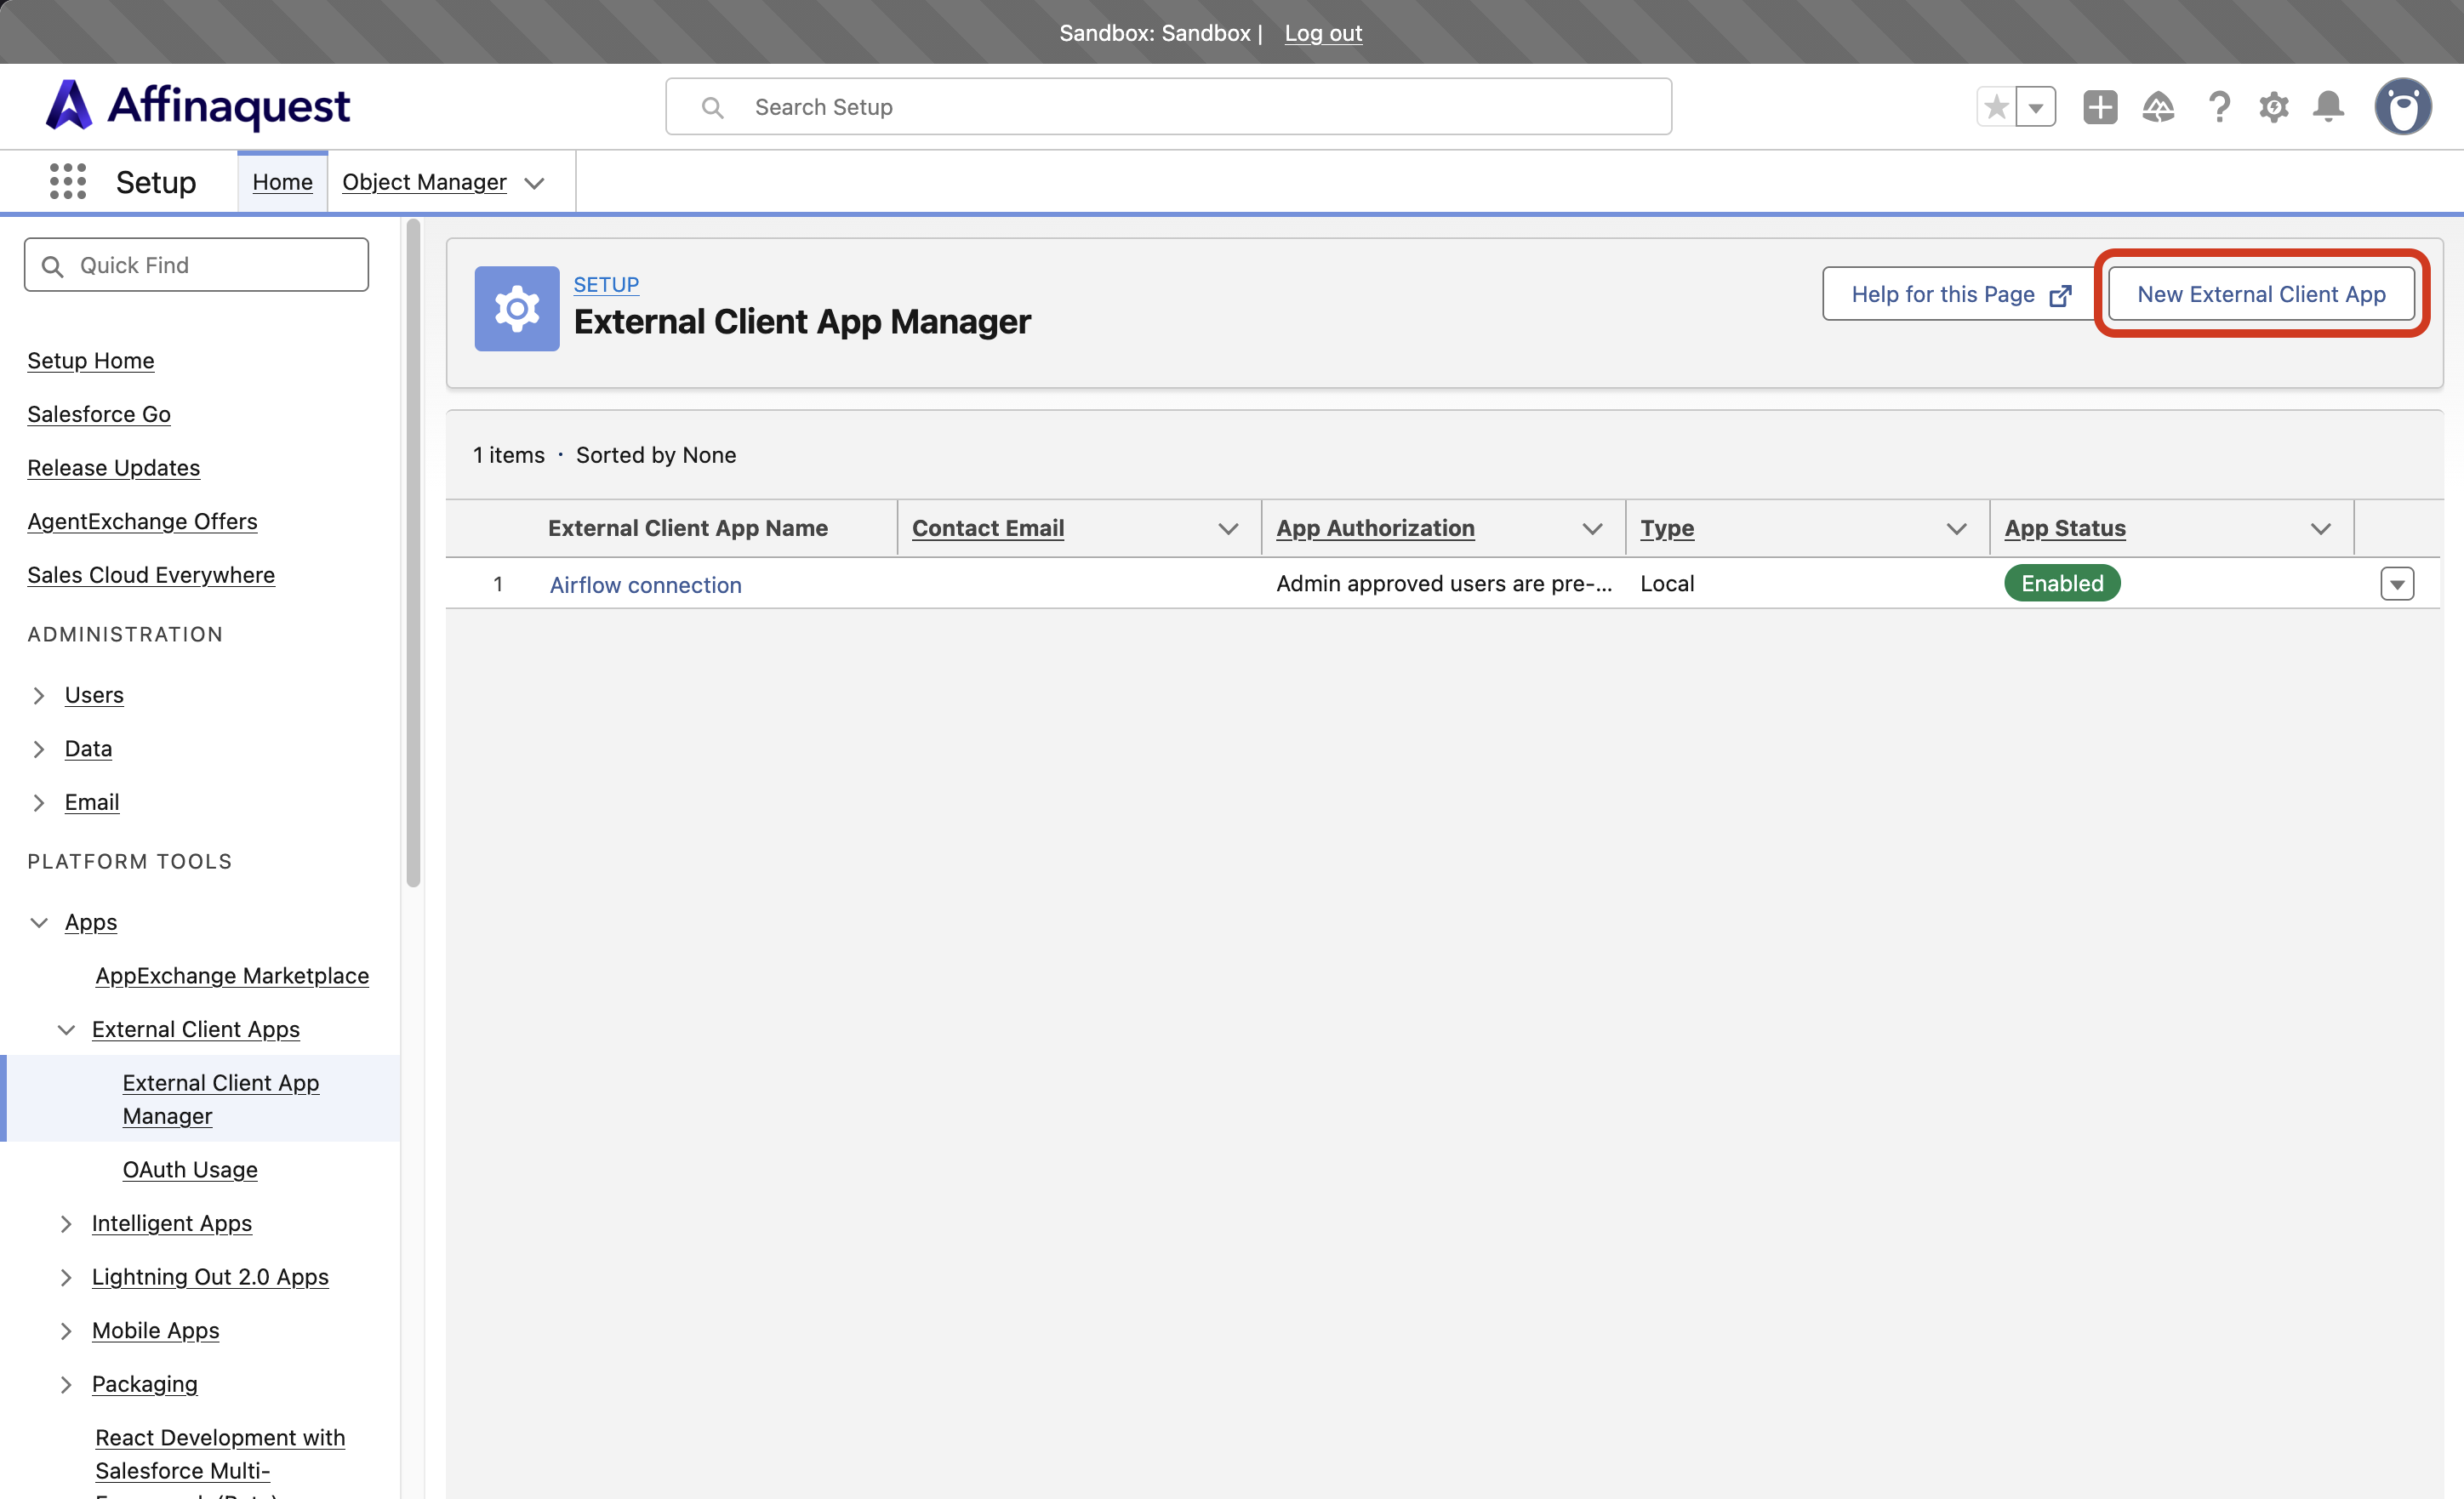
After clicking on 'External Client App Manager', the list of existing External Client Apps will appear. Each app has a dedicated page, which notably contains the details of its configuration, that can be accessed by simply clicking on its name. The page to create a new External Client App can be accessed by clicking on the 'New External Client App' button located on the top-right corner of the External Client App Manager page.
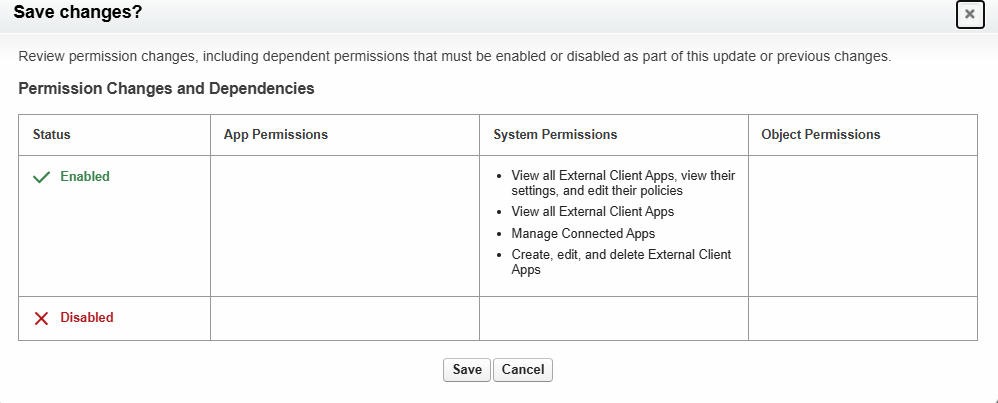
In Salesforce, a user that wants to create and manage External Client Apps needs to have a profile with the appropriate permissions: 'Create, edit and delete External Client Apps', 'View all External Client Apps' and 'View all External Client Apps, view their settings, and edit their policies'. These permissions can be granted to a profile by an administrator in the 'System Permissions' of the profile, which can be found in the 'Setup' section (in the 'System' section, at the top of the page), under 'Administration' > 'Users' > 'Profiles'.
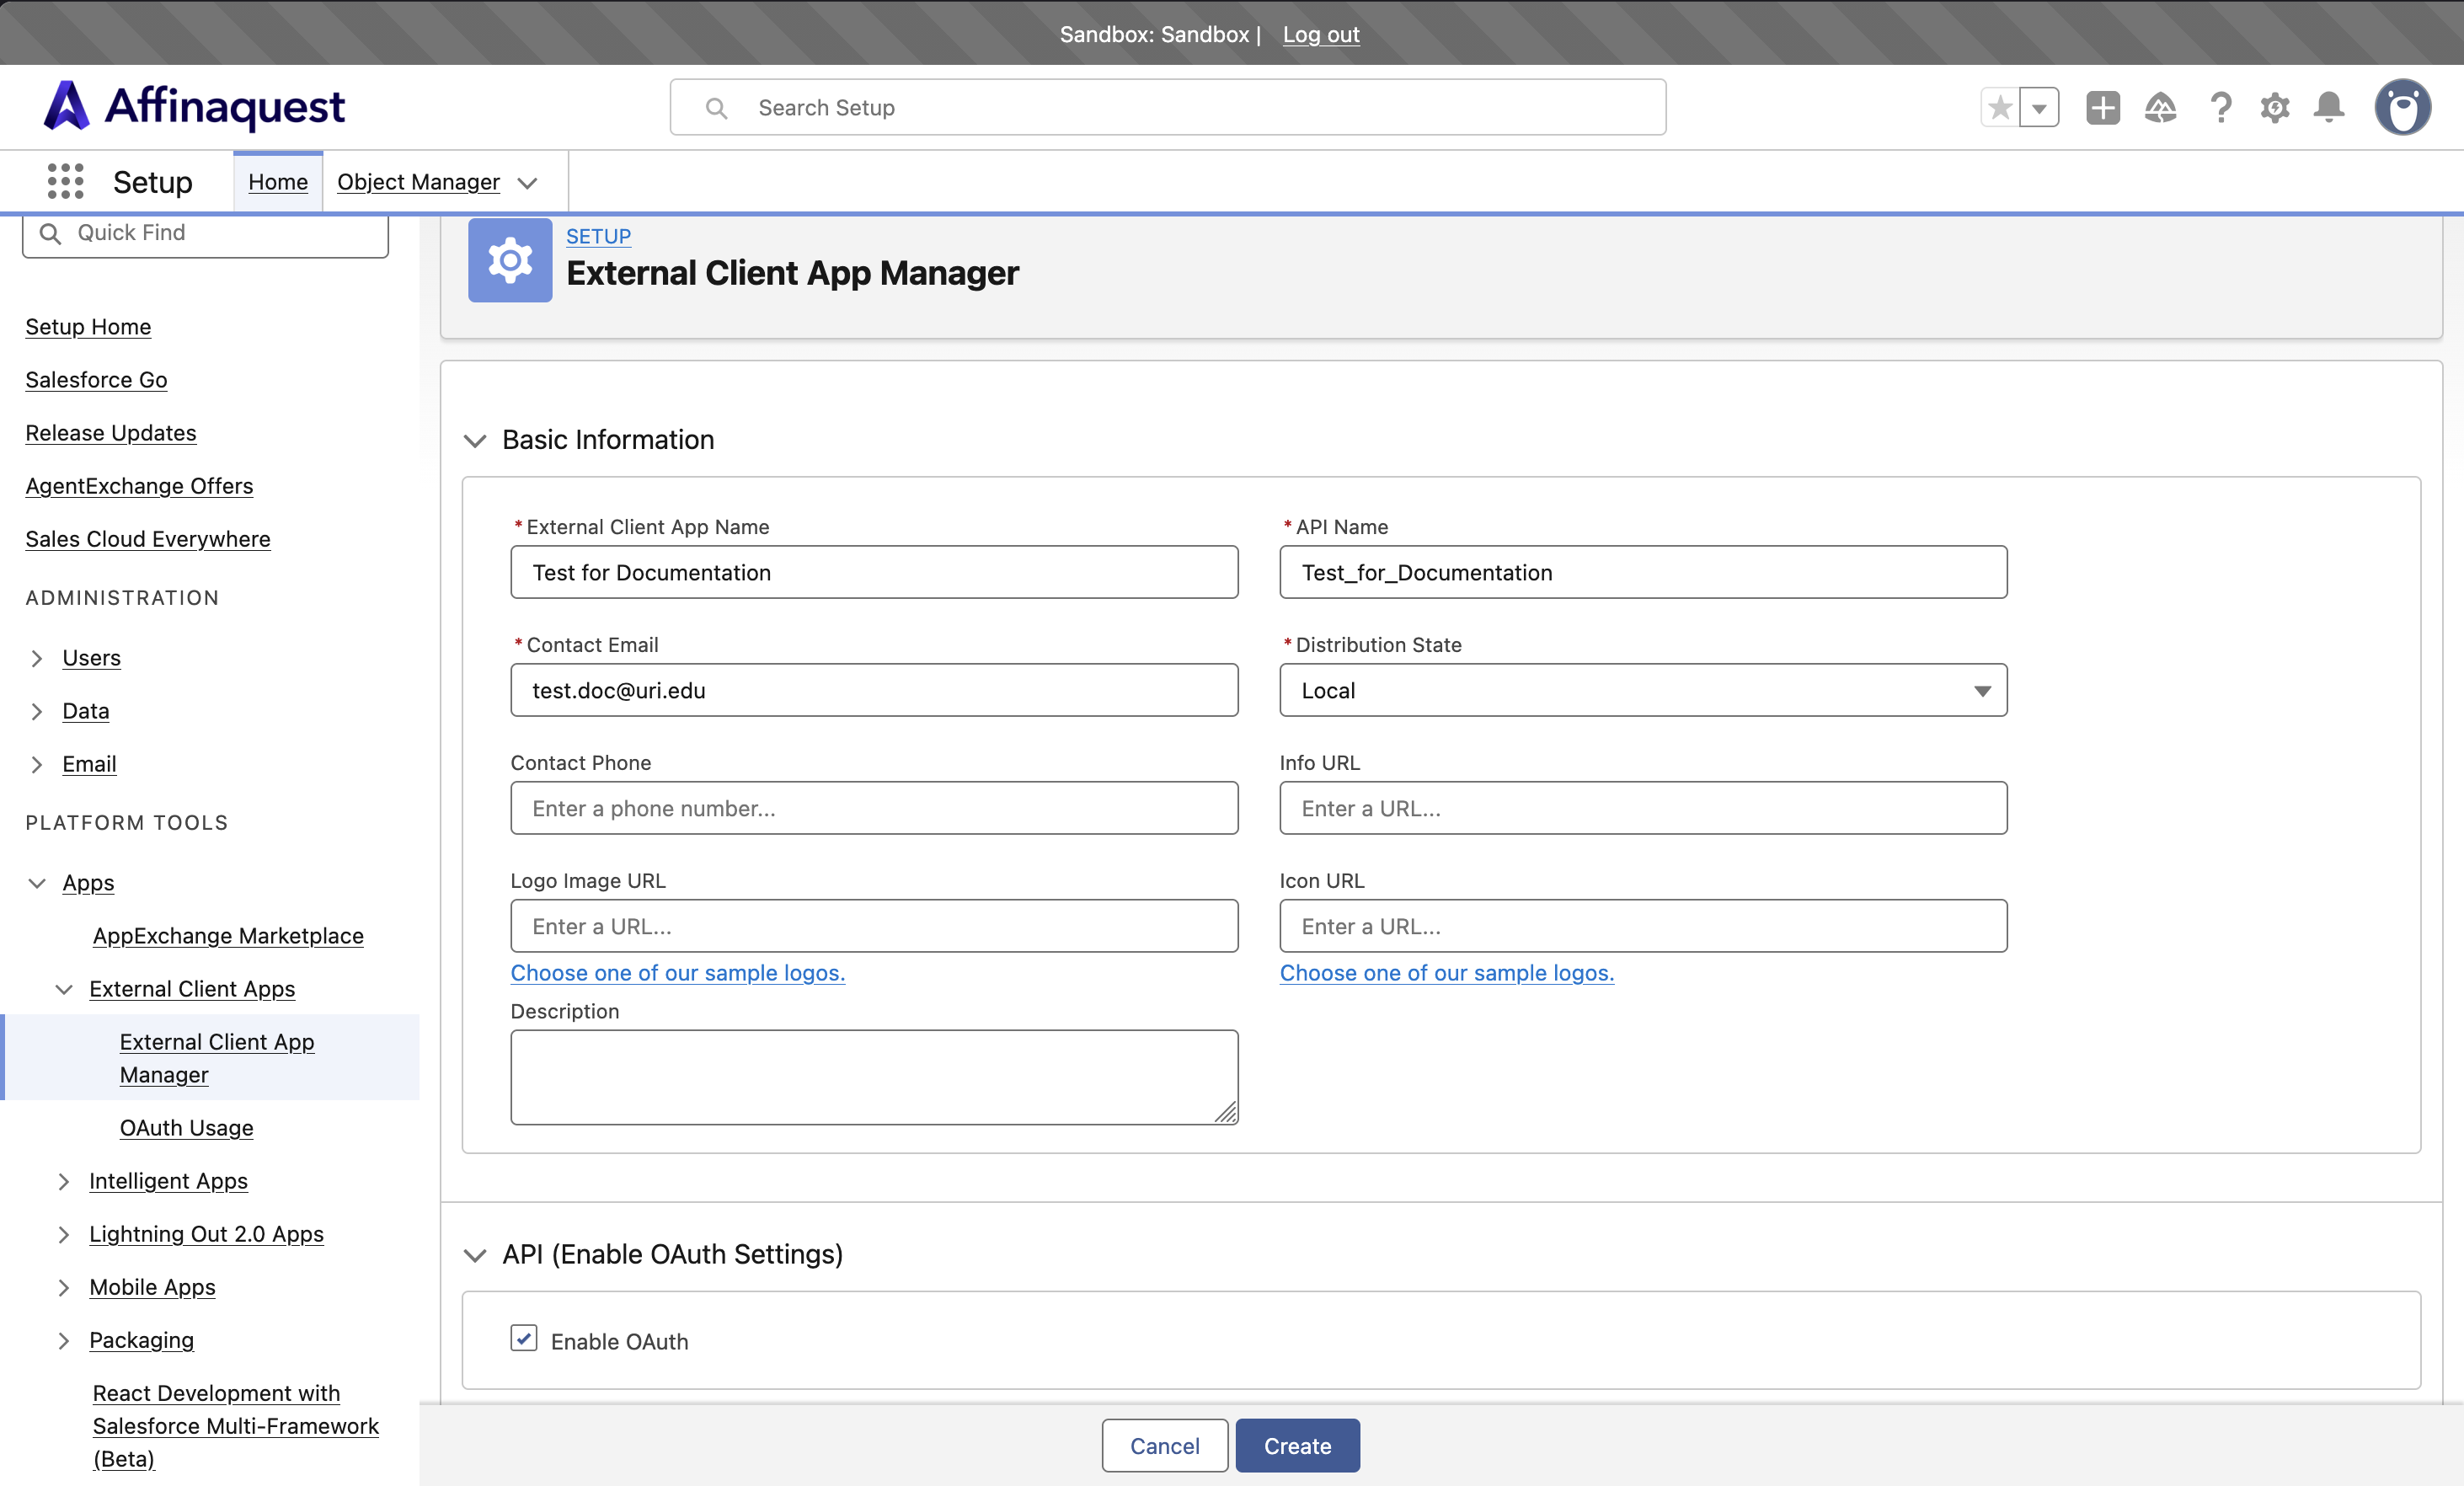
First, basic information for the new External Client App needs to be filled in. It is very straightforward—the new app simply needs a name, an API name (usually the name of the app with underscores instead of white spaces, which should be automatically filled in by Salesforce when the name of the app is typed) and a contact email (can be anything, usually the work email of the developer creating the app). Additional information can be given as well (a contact phone, an icon for the app, etc.).
Before moving to the next step, the distribution state of the new app needs to be selected. Once an External Client App has been created and configured in a Salesforce org, it can be packaged and sent to other Salesforce orgs that might want to use it. For this project, and therefore for the proof of concept as well, the goal is to create an integration only between an Apache Airflow environment and the Salesforce orgs of the URI Foundation, so the distribution state that was selected is local. Indications to package and send an External Client App can be found here, but it is not covered in this documentation.
Once basic information has been filled in, OAuth needs to be enabled. This can be done by clicking on the 'API (Enable OAuth Settings)' tab and checking the box labelled 'Enable OAuth'. After this box is checked, the section to configure OAuth appears.
There are other tabs below the 'API (Enable OAuth Settings)' tab, which can be used to configure specific settings for the External Client App. These settings were not needed for the proof of concept and will likely not be needed in the future for this project, so they are not covered in this documentation.
OAuth
Before going over the different steps to configure OAuth, it is necessary to explain what it is.
What is OAuth?
An External Client App can be seen as an entry point through which third-party applications can connect to a Salesforce org in order to access its data and perform actions. Metaphorically, it acts as a door that any entity outside of Salesforce must pass through to reach the org. Without an External Client App, there are no doors, and the org remains inaccessible to external applications.
Continuing the metaphor, an External Client App only defines the door itself, not the process for opening it. When an third-party application wants to access a Salesforce org through an External Client App, it first needs to be authenticated and authorized. To do so, External Client Apps rely on several protocols and standards. OAuth is one of them, used for authorization. The current version of OAuth is OAuth 2.0.
OAuth 2.0, which stands for “Open Authorization”, is a standard designed to allow a website or application to access resources hosted by other web apps on behalf of a user.
Roles
OAuth 2.0 provides a mechanism that lets an application access protected resources stored in another application on behalf of a user without having to expose the user's credentials. This mechanism involves four actors with different roles:
- The Resource Owner: the user who owns the data and grants access to it
- The Client: the application that wants to access the data
- The Authorization Server: the system that authenticates the Resource Owner and issues access tokens to the Client
- The Resource Server: the system that hosts the data and accepts access tokens to grant access to it
Access Tokens
OAuth 2.0 relies on Access Tokens. These tokens are issued by the Authorization Server and let the Client access the protected resources of the Resource Owner stored on the Resource Server for a short amount of time.
An Access Token is a piece of data that represents the authorization to access resources on behalf of the end-user.
All Access Tokens have scopes tied to them. A scope specifies which actions and/or data a token gives access to. Each application that uses OAuth 2.0 defines its own specific scopes.
How does OAuth work?
Before a Client can request any Access Token, it needs to be registered on the Authorization Server. Once registered, it receives a Client ID and a Client Secret. This way, only Clients that have been registered can request Access Tokens.
On Salesforce, creating an External Client App and enabling OAuth is the equivalent of registering a Client on the Authorization Server. The only difference is that it doesn't register one specific Client but rather an entry point, as mentioned earlier, that multiple Clients can connect to if they have the credentials, called Consumer Key and Secret instead of Client ID and Secret.
Once a Client has been registered on an Authorization Server and received its credentials, it can request Access Tokens. OAuth 2.0 defines different ways for Clients to request and receive Access Tokens.
Flows or Grant Types
A flow, also called a grant, is a set of steps a Client has to go through in order to retrieve an Access Token. These flows exist to address different scenarios. Choosing the appropriate flow for a Client that needs to access resources on a Resource Server depends on the capabilities of the Client, its security requirements, the type of integration that is being built, etc.
Application grant types (or flows) are methods through which applications can gain Access Tokens and by which you grant limited access to your resources to another entity without exposing credentials. The OAuth 2.0 protocol supports several types of grants, which allow different types of access.
OAuth 2.0 defines multiple flows, but this page only covers three of them: Authorization Code, Client Credentials, and JWT Bearer.
Authorization Code
The most common flow is Authorization Code. It is designed for scenarios where a user (Resource Owner) interacts with a Client through a web browser to grant access to their data. In this flow, the Client must provide its Client ID and its Client Secret to the Authorization Server in order to request Access Tokens, so the Client Secret needs to be stored securely on the server side and never be publicly displayed on the client side. The steps required for this flow are the following:
- The Client redirects the user to the Authorization Server's login page
- The user authenticates (e.g., enters their username and password) and approves the requested permissions (equivalent to the scopes mentioned earlier)
- The Authorization Server redirects the user back to the Client with a short-lived Authorization Code
- The Client sends this Authorization Code to the Authorization Server, along with its own credentials (Client ID and Client Secret), to prove its identity
- The Authorization Server verifies everything and returns an Access Token to the Client
- The Client uses the Access Token to make requests to the Resource Server on behalf of the user
The use of an intermediate Authorization Code, rather than returning the Access Token directly, adds a layer of security—the Access Token is always exchanged on the server side between the Client and the Authorization Server and is never exposed in the user's browser.
This is the flow used by web applications that let users log in using Google or Facebook, for example. Once a user logs into their account and authenticate themselves, the Client can access their data on the Resource Server (Google, Facebook or other), such as their email, their username, their profile picture, etc.
OAuth 2.0 is an authorization protocol and not an authentication protocol. In the Authorization Code flow, users (Resources Owners) have to authenticate themselves on the Authorization Server in order to grant access to their personal data to the Client. For the authentication process, Authorization Servers can use different protocols. Most modern web apps use OpenID, which relies on OAuth 2.0 to provide authentication and authorization at the same time.
When registering a new Client that will use the Authorization Code flow on an Authorization Server, a callback URL needs to be provided. This URL points to a page of the web application (Client) the Authorization Server will send the Authorization Code and redirect the user to once it has been authenticated.
For certain web applications that cannot store securely their Client Secret, an even more secure version of this flow exists, called Authorization Code Flow with Proof Key for Code Exchange (PKCE). It is not covered on this page.
Client Credentials
The Client Credentials flow, also very common, is much simpler than the Authorization Code flow. It is designed for server-to-server integrations—scenarios where no user is involved and the Client needs to access resources stored in a Resource Server on its own behalf, most commonly for automation purposes. The steps required for this flow are the following:
- The Client sends its credentials (Client ID and Client Secret) directly to the Authorization Server
- The Authorization Server verifies the credentials and, if valid, returns an Access Token to the Client
- The Client uses this access token to make requests to the Resource Server
In this flow, there is no additional authentication process needed. The Client will always access the resources of the same user account (Resource Owner) on the Resource Server—usually, this account is defined during the registration process on the Authorization Server. However, as in the Authorization Code flow, the Client must provide its Client ID and its Client Secret, so the Client Secret must be stored securely on the server.
JWT Bearer
The JWT (JSON Web Token) Bearer flow offers the advantages of both flows presented above, all while being simpler than the Authorization Code flow and more secure than the Client Credentials flow. It is also designed for server-to-server integrations, but lets the Client act on behalf of different users without requiring any interaction—users do not have to manually log into their account to grant access to their data to the Client. The steps required for this flow are the following:
- The Client generates a JWT (JSON Web Token) containing information such as its identity, the user it wants to act on behalf of, and an expiration time
- The Client signs the JWT using a private key. The corresponding public key (or certificate) has been previously registered with the Authorization Server
- The Client sends the signed JWT to the Authorization Server.
- The Authorization Server verifies the JWT's signature using the registered public key and checks its contents
- If everything is valid, the Authorization Server returns an Access Token to the Client
- The Client uses this access token to make requests to the Resource Server
This flow can only be used if a trust has been established between the Client and the Authorization Server during the registration process, which involves public-key cryptography. To request Access Tokens to the Authorization Server, the Client must provide its Client ID but not its Client Secret—it will prove its identity by using a private key instead.
Configuring OAuth in an External Client App
As explained in the previous section, OAuth 2.0 involves four actors with different roles. In this project, these actors are:
- The Client: the Apache Airflow environment
- The Authorization Server: the External Client App
- The Resource Server: the Salesforce org
The Resource Owner depends on the flow that is selected and the policies that are selected for the External Client App.
Configuring OAuth settings
The section to configure OAuth contains several subsections.
App Settings
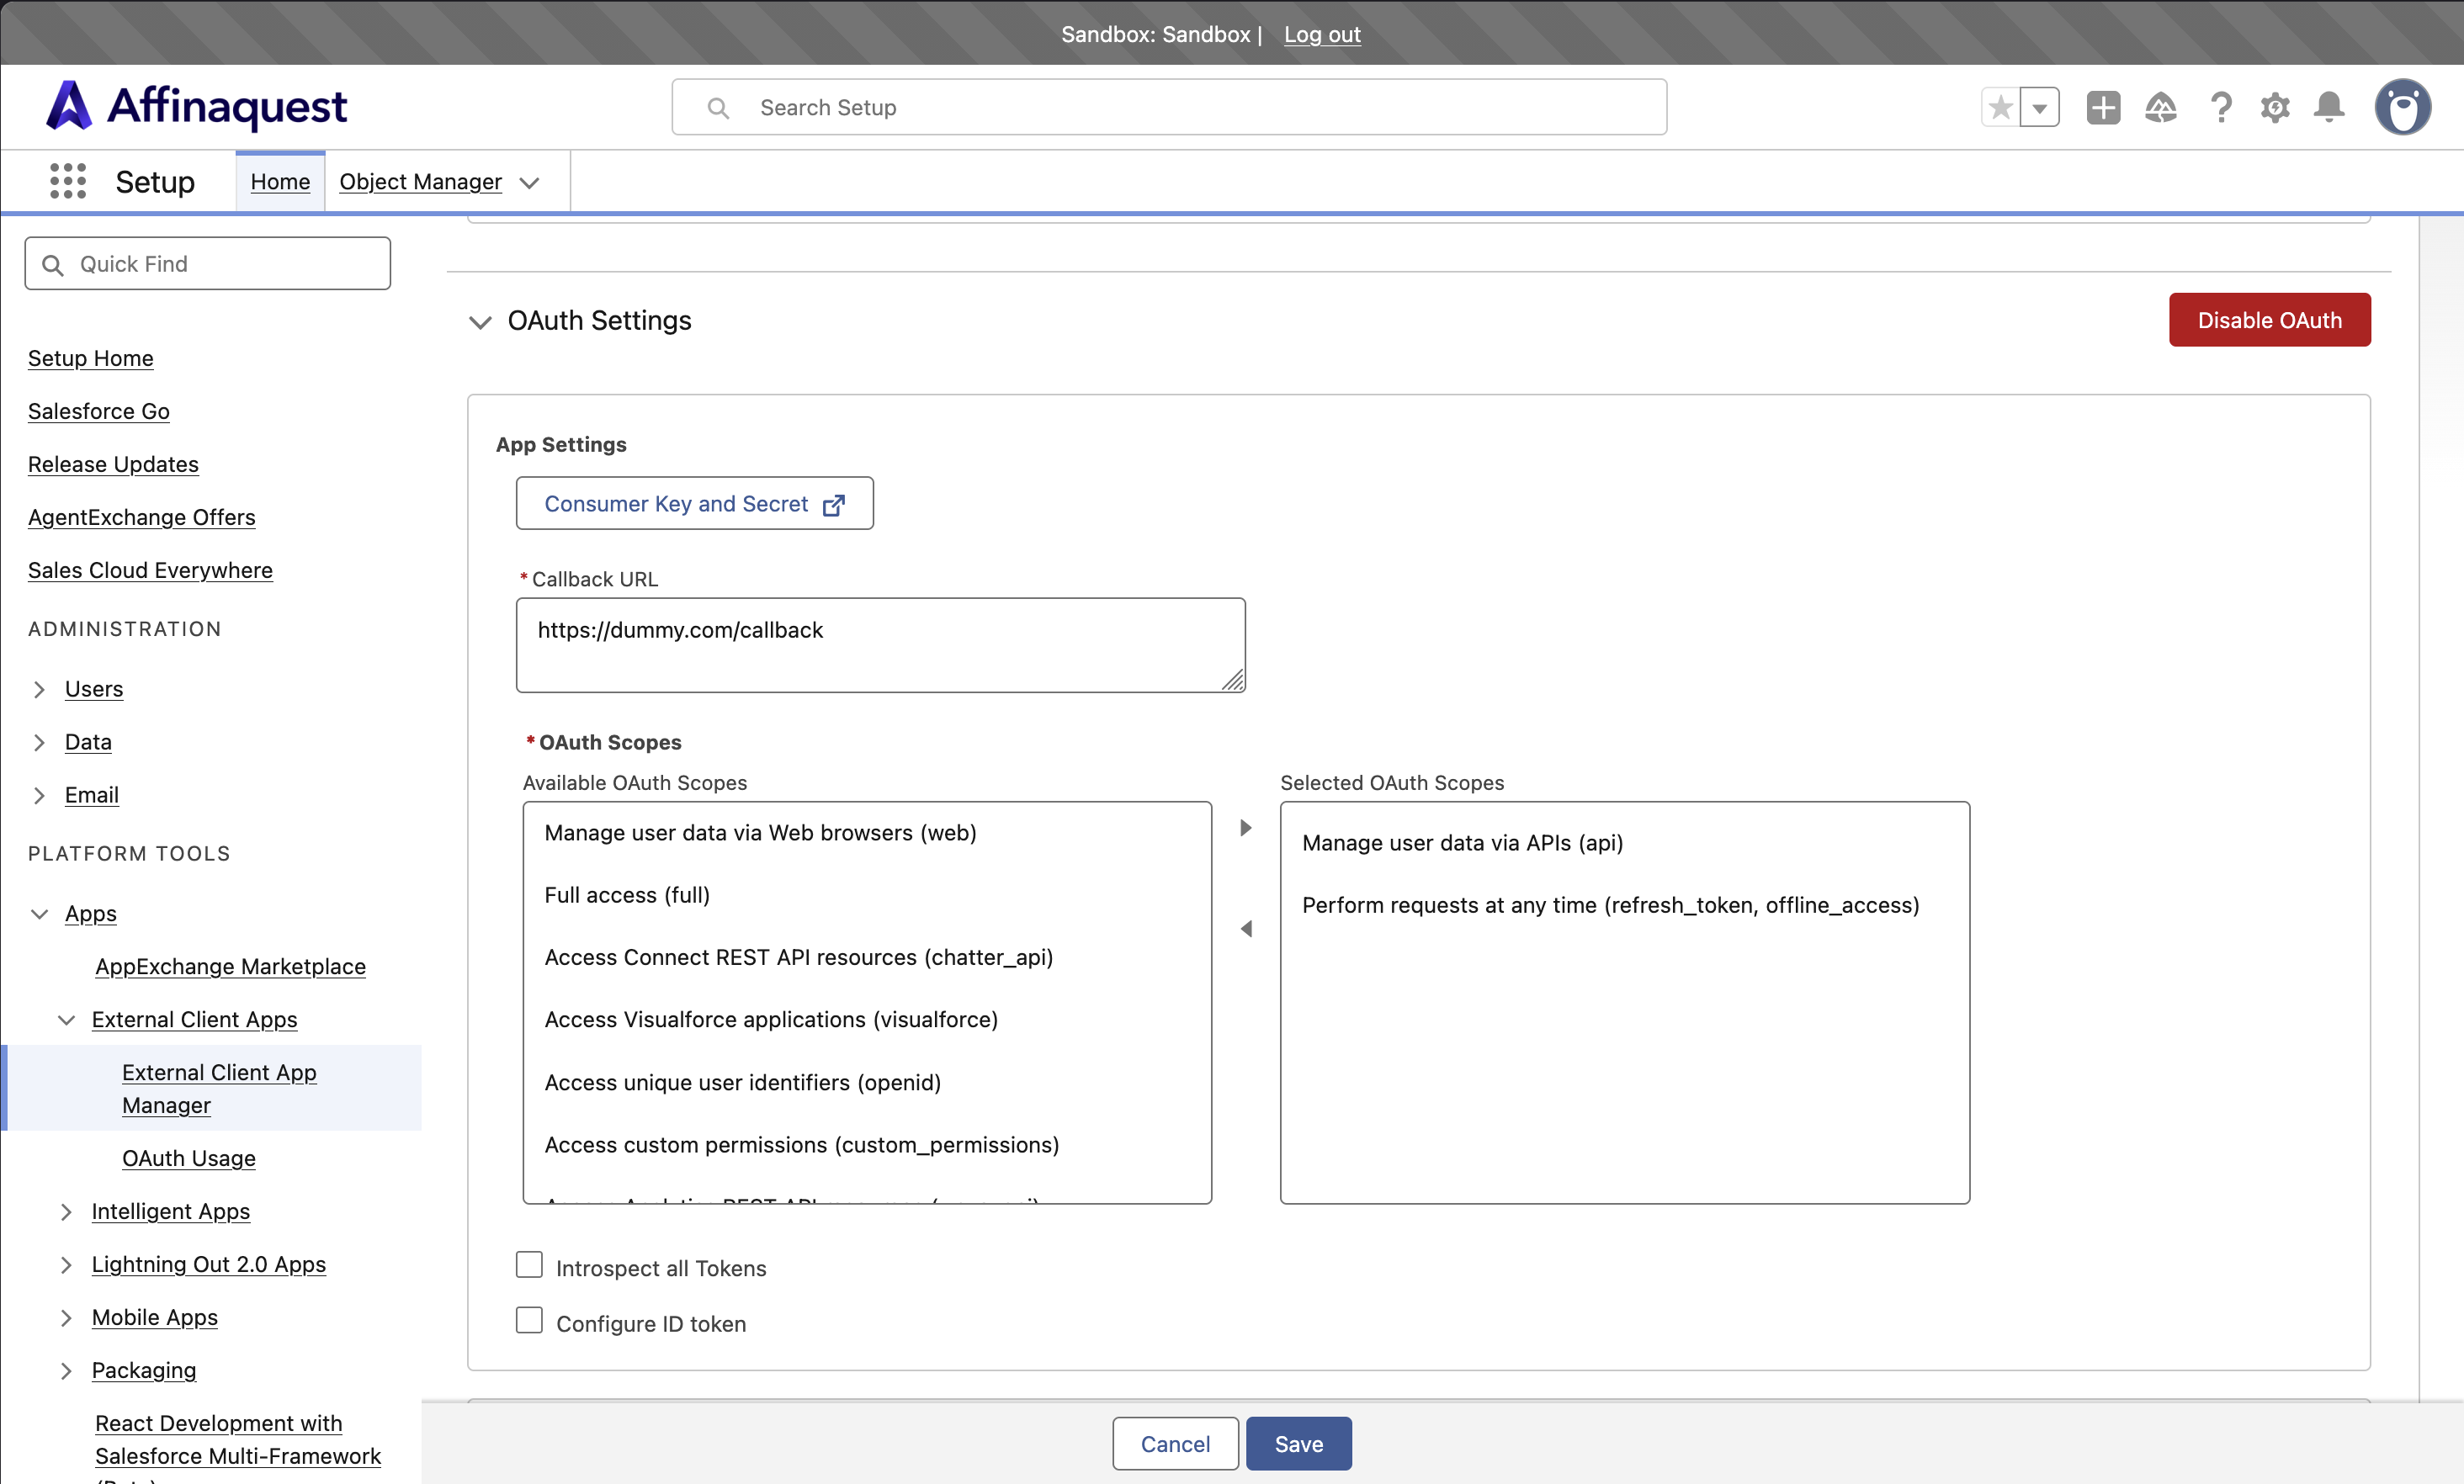
On top of this subsection can be found a button to access the Consumer Key and Secret of the External Client App. Accessing these credentials requires a verification code that is sent by email. The Consumer Secret must remain secret.
In the Callback URL text area, the callback URL(s) of the External Client App can be entered. As explained in the previous section of this chapter, a callback URL is only needed for the Authorization Code flow. As the connection between Apache Airflow and Salesforce is a server-to-server integration, this flow will not be used and therefore there is no need for a callback URL. However, this field is mandatory in Salesforce, no matter what flow is selected. To bypass this requirement, a dummy URL can be entered—it can be anything, as long as it has the structure of a valid URL, otherwise Salesforce will display an error message and not save the configuration. This solution was chosen for the proof of concept.
Under OAuth Scopes, the scopes of the External Client App can be selected. On the right, the list of all available OAuth scopes can be found. These scopes give access to different services, APIs, actions and/or data to third-party applications. By using the arrows, scopes can be moved from one list to another—to select a scope, it needs to be moved to the list on the left, 'Selected OAuth Scopes'. Each External Client App will have different scopes selected according to various factors, including the capabilities of the third-party applications and the type of integration that is being built—a description of each available scope can be found here. However, for most server-to-server integration, 'Manage user data via APIs (api)' or 'Full access (full)' and 'Perform requests at any time (refresh_token, offline_access)' should be sufficient. For the proof of concept, only 'Manage user data via APIs (api)' and 'Perform requests at any time (refresh_token, offline_access)' were selected.
The two checkboxes, 'Introspect all Tokens' and 'Configure ID token', can be used to enable or disable settings related to the OpenID protocol. This protocol is not used in the proof of concept and will likely not be used in the future for this project, so the settings tied to these checkboxes are not presented more in detail in this documentation. If needed, more information can be found here and here.
Flow Enablement
In this subsection, the OAuth flow(s) of the External Client App can be enabled. Five different flows are available: Client Credentials, Authorization Code, Device, JWT Bearer and Token Exchange. A single External Client App can enable several flows simultaneously—for this project, only one is needed. The Client Credentials flow, the Authorization Code flow as well as the JWT Bearer flow have already been presented in a previous section of this chapter. The Device flow can be used for IoT (Internet of Things) integrations and the Token Exchange flow can be used for complex integrations that involve multiple applications connected to each other. These flows are not relevant for this project, so they are not presented in further details in this documentation.
Except for the JWT Bearer flow, which requires additional steps, enabling an OAuth flow is extremely straightforward: the checkbox associated to the flow simply has to be checked.
As mentioned in the previous section, the connection between Apache Airflow and Salesforce is a server-to-server integration. Therefore, the Authorization Code flow will not be used in this project, and only two flows are left: Client Credentials flow and JWT Bearer flow. For the proof of concept, the Client Credentials flow was first selected. However, the Salesforce provider in Apache Airflow (explained in a following section on this page) does not support it. Even though this flow is very straightforward, it would have required to write the code to establish the connection, which would have taken a long time and would have increased the risk of vulnerabilities. Instead, the JWT Bearer flow, which is more secure and supported by the Salesforce provider in Airflow, was enabled.
In the presentation of the JWT Bearer flow (see previous section), it is mentioned that a trust needs to be established between the Authorization Server and the Client during the registration process, which involves public-key cryptography. Therefore, after the checkbox is checked, a certificate needs to be uploaded.
An X.509 certificate ties an identity to a public key. A certificate is usually signed by a trusted third-party, called a certificate authority, to prove its authenticity. For the JWT Bearer flow in Salesforce, a certificate is simply a practical way of encapsulating and storing a public key–Salesforce will not verify the signature. Therefore, what is called a self-signed certificate can be used. Before creating such a certificate, a key pair must be generated. By using OpenSSL on Linux, MacOS or Windows with WSL, the key pair and the certificate can be generated in a single command:
openssl req -x509 -newkey rsa:2048 -keyout key.pem -out cert.pem -sha256 -nodes -days 365The number of days (after -days) the certificate will be valid for can be increased or reduced if necessary. If the private key must be protected by a password, -nodes has to be removed—a prompt will ask to enter a password after the command is executed.
After the command is executed, several prompts will ask to enter some details about the certificate (address, organization name, common name, email address). In the context of the JWT Bearer flow in Salesforce, these details are complementary and most fields can be left blank—the only one that cannot be blank is the 'Common Name', but its content does not matter and anything can be entered.
After the certificate has been generated, it can be uploaded to Salesforce.
Salesforce does not offer the possibility to upload more than one certificate per External Client App. Since an X.509 certificate contains a single public key and each public key is tied to exactly one private key, this limitation creates challenges when multiple Apache Airflow environments running on different machines need to access the same External Client App. A private key is a sensitive piece of data that must remain confidential at all times. Once generated, it should be stored securely and never be moved or shared. Several Airflow environments running on the same machine or AWS account can safely share the same private key, as long as it is not duplicated or moved. However, a private key must never be reused across environments running on different machines or AWS accounts. When multiple Airflow environments need to access the same Salesforce org, the only secure solution is to create a separate External Client App for each environment, using identical settings but a dedicated key pair and certificate for each environment. As a best practice, it would be recommended to follow this approach even when the environments are running on the same machine or AWS account.
Security
In this subsection, additional security settings for different OAuth flows can be enabled or disabled.
If the first checkbox, 'Require secret for Web Server Flow', is checked, the Consumer Secret (Client Secret) must be provided to the Authorization Server by the Client in order to retrieve an Access Token—Web Server Flow is another name given to the Authorization Code flow by Salesforce. As the proof of concept does not use this flow, this setting was not enabled.
If the second checkbox, 'Require secret for Refresh Token flow', is checked, the Consumer Secret (Client Secret) must be provided to the Authorization Server by the Client in order to retrieve a Refresh Token. A Refresh Token is another type of OAuth token, valid for a longer period of time than an Access Token, which can be used by the Client to request a new Access Token without requiring any user interaction—the user does not have to log in again. This mechanism is mostly used by the Authorization Code flow, but it can be useful to any OAuth flow that requires users to log in manually for authentication—server-to-server integration flows, such as the Client Credentials flow or the JWT Bearer flow, do not need Refresh Tokens. In Salesforce, Refresh Tokens are used by the Authorization Code/Web Server flow and the User-Agent flow, but the latter has been deprecated. In the Salesforce documentation and in the OAuth documentation, the Refresh Token flow is considered a distinct flow, equivalent to the other flows mentioned on this page. The only difference is that it is not a standalone flow—it cannot be used to request and retrieve the first Access Token. The Refresh Token flow can only be used once a user has authenticated themselves and the Client has retrieved an Access Token as well as a Refresh Token using the Authorization Code/Web Server flow. As the proof of concept does not use this flow, this setting was not enabled.
The third checkbox, 'Require Proof Key for Code Exchange (PKCE) extension for Supported Authorization Flows', can be checked to enable the more secure version of the Authorization Code/Web Server flow, called Authorization Code Flow with Proof Key for Code Exchange (PKCE), which is briefly mentioned in a previous section of this page. As the proof of concept does not use this flow, this setting was not enabled.
The fourth checkbox, 'Enable Refresh Token Rotation', can be checked to make the Refresh Token flow more secure—each time the Client requests an Access Token using a Refresh Token, a new one is issued and the old one is invalidated. The flow used by the proof of concept does not need Refresh Tokens, so this setting was not enabled.
If the fifth checkbox, 'Issue JSON Web Token (JWT)-based access tokens for named users', is checked, Salesforce will issue JSON Web Tokens (JWT) for Access Tokens. The OAuth standard does not specify a format for Access Tokens or Refresh Tokens—any application that uses OAuth can generate tokens in the format they want. With this setting enabled, Salesforce generates Access Tokens in the JWT format, which is widely used and standardized, instead of generating them in its own opaque format. This can be useful for some third-party applications with specific requirements—it is not needed for the proof of concept, so this setting was not enabled.
This setting is not related to the JWT Bearer flow and does not have to be enabled in order to use it.
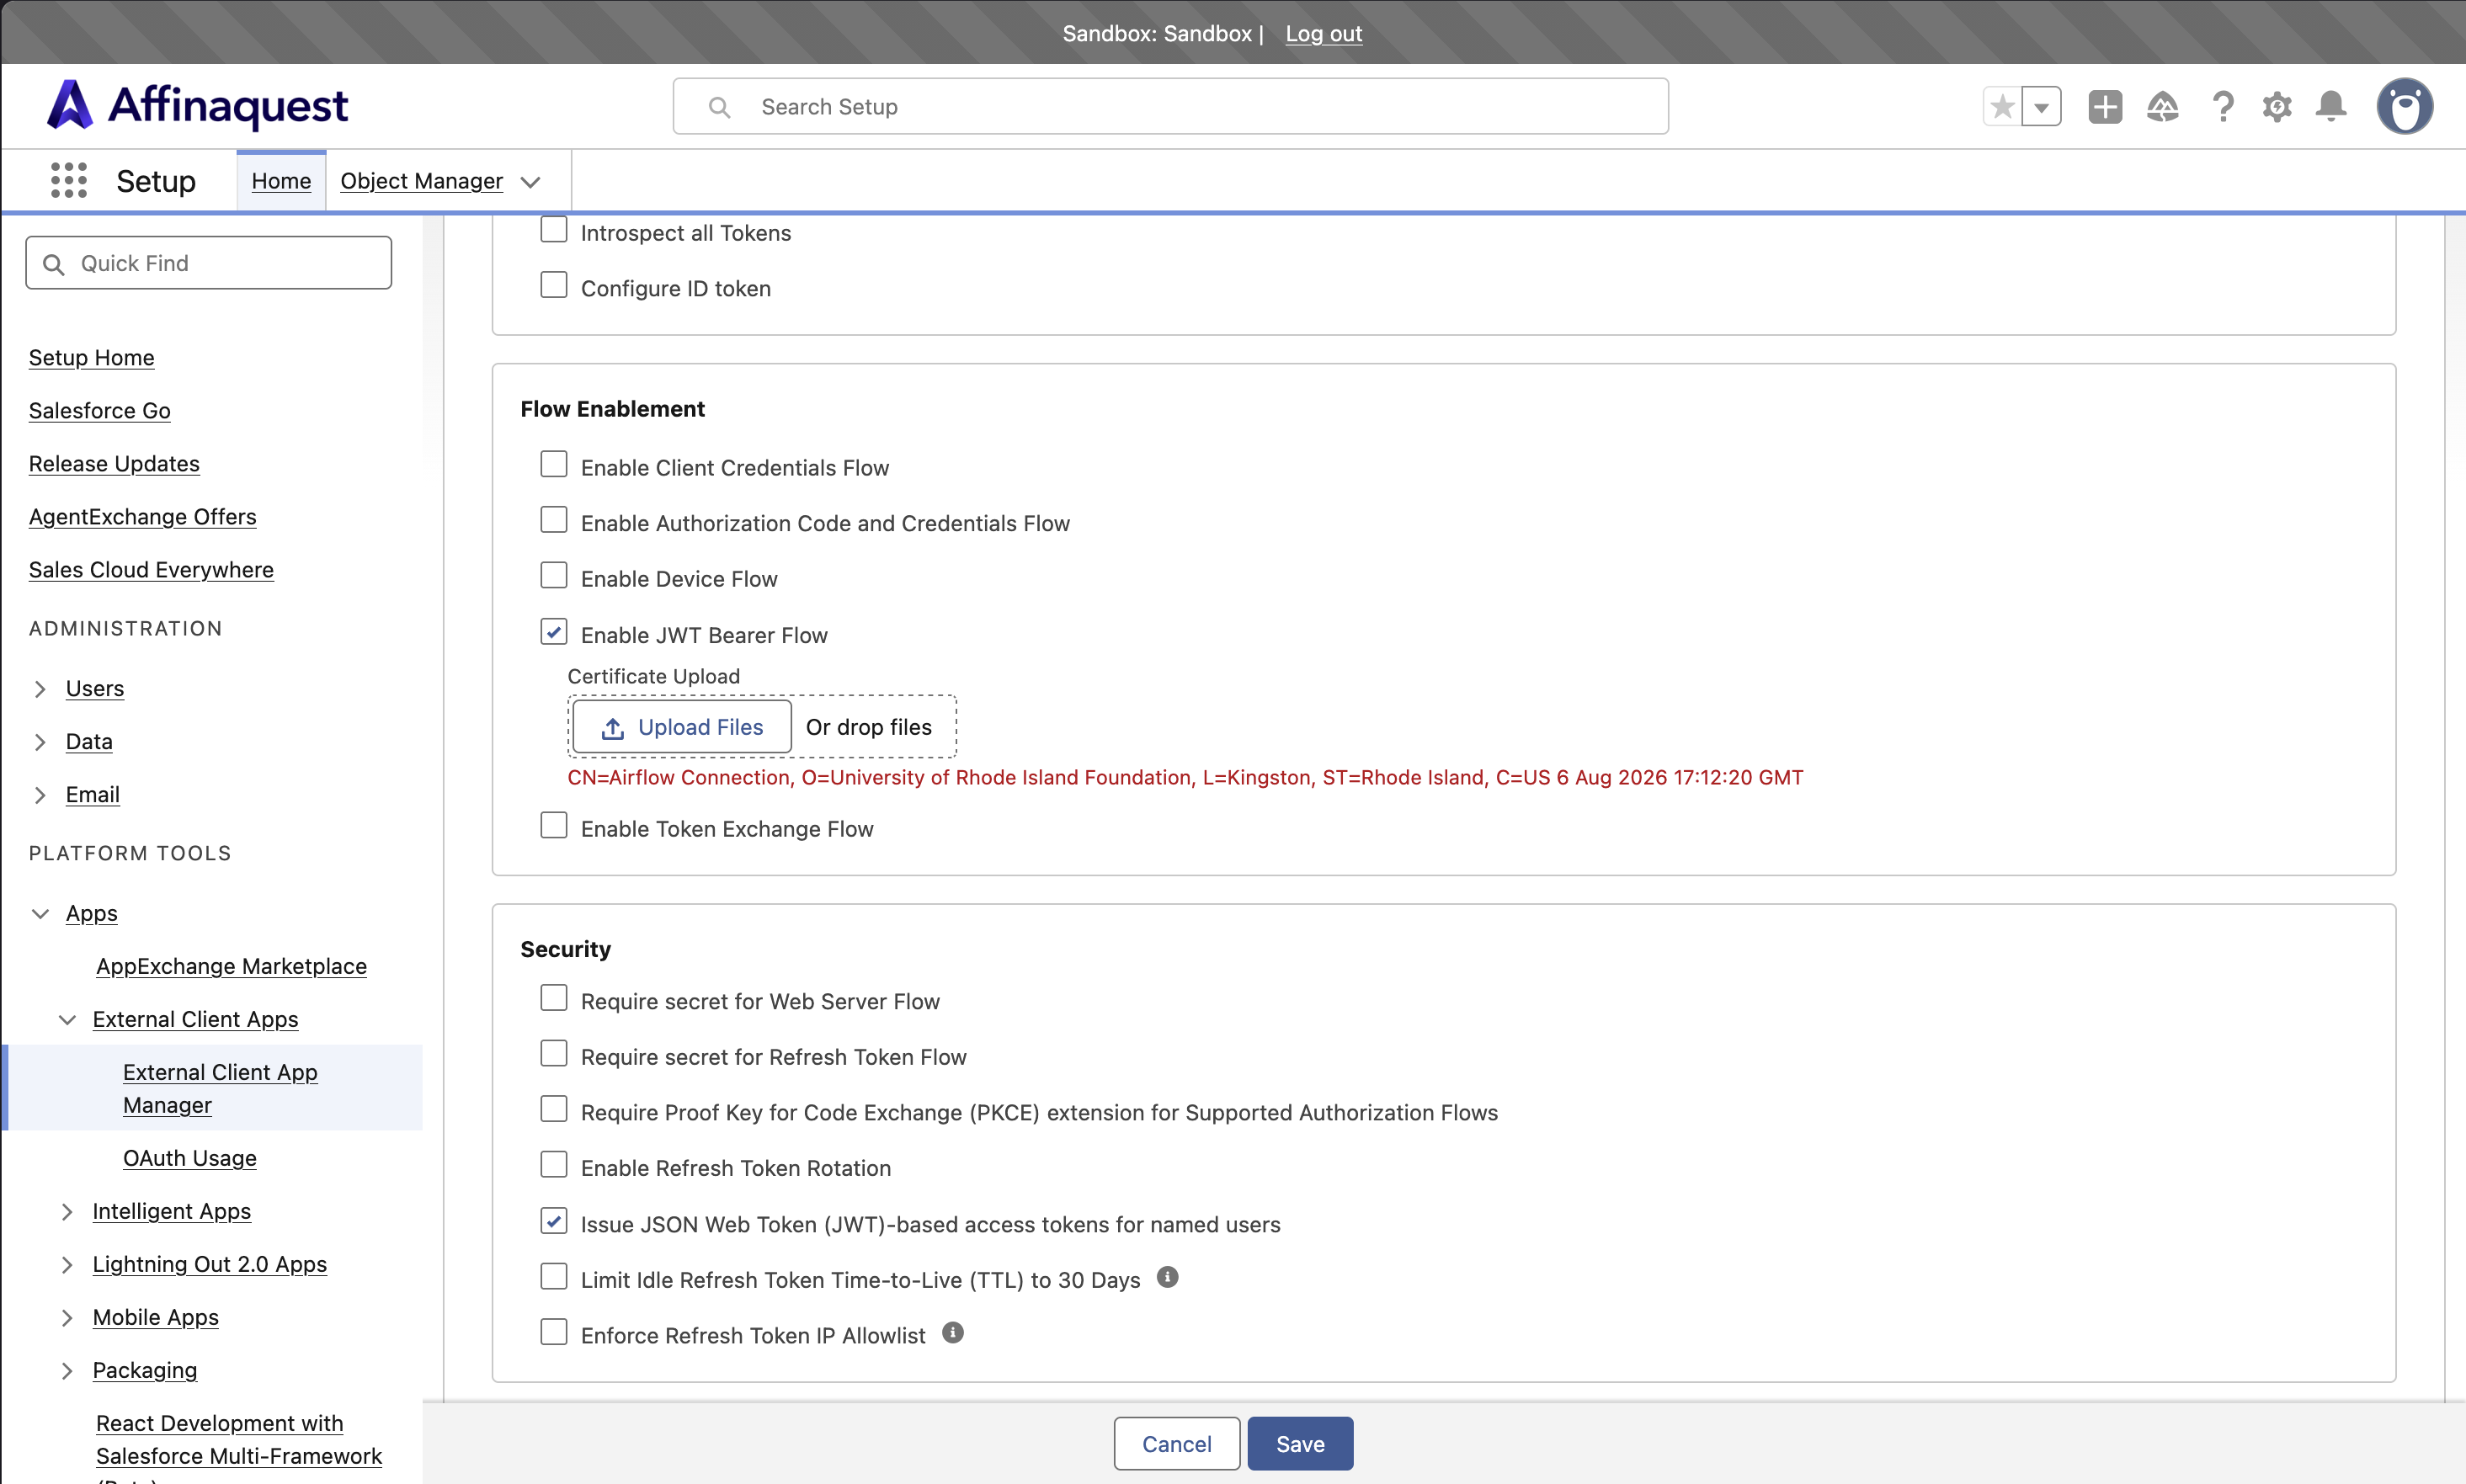
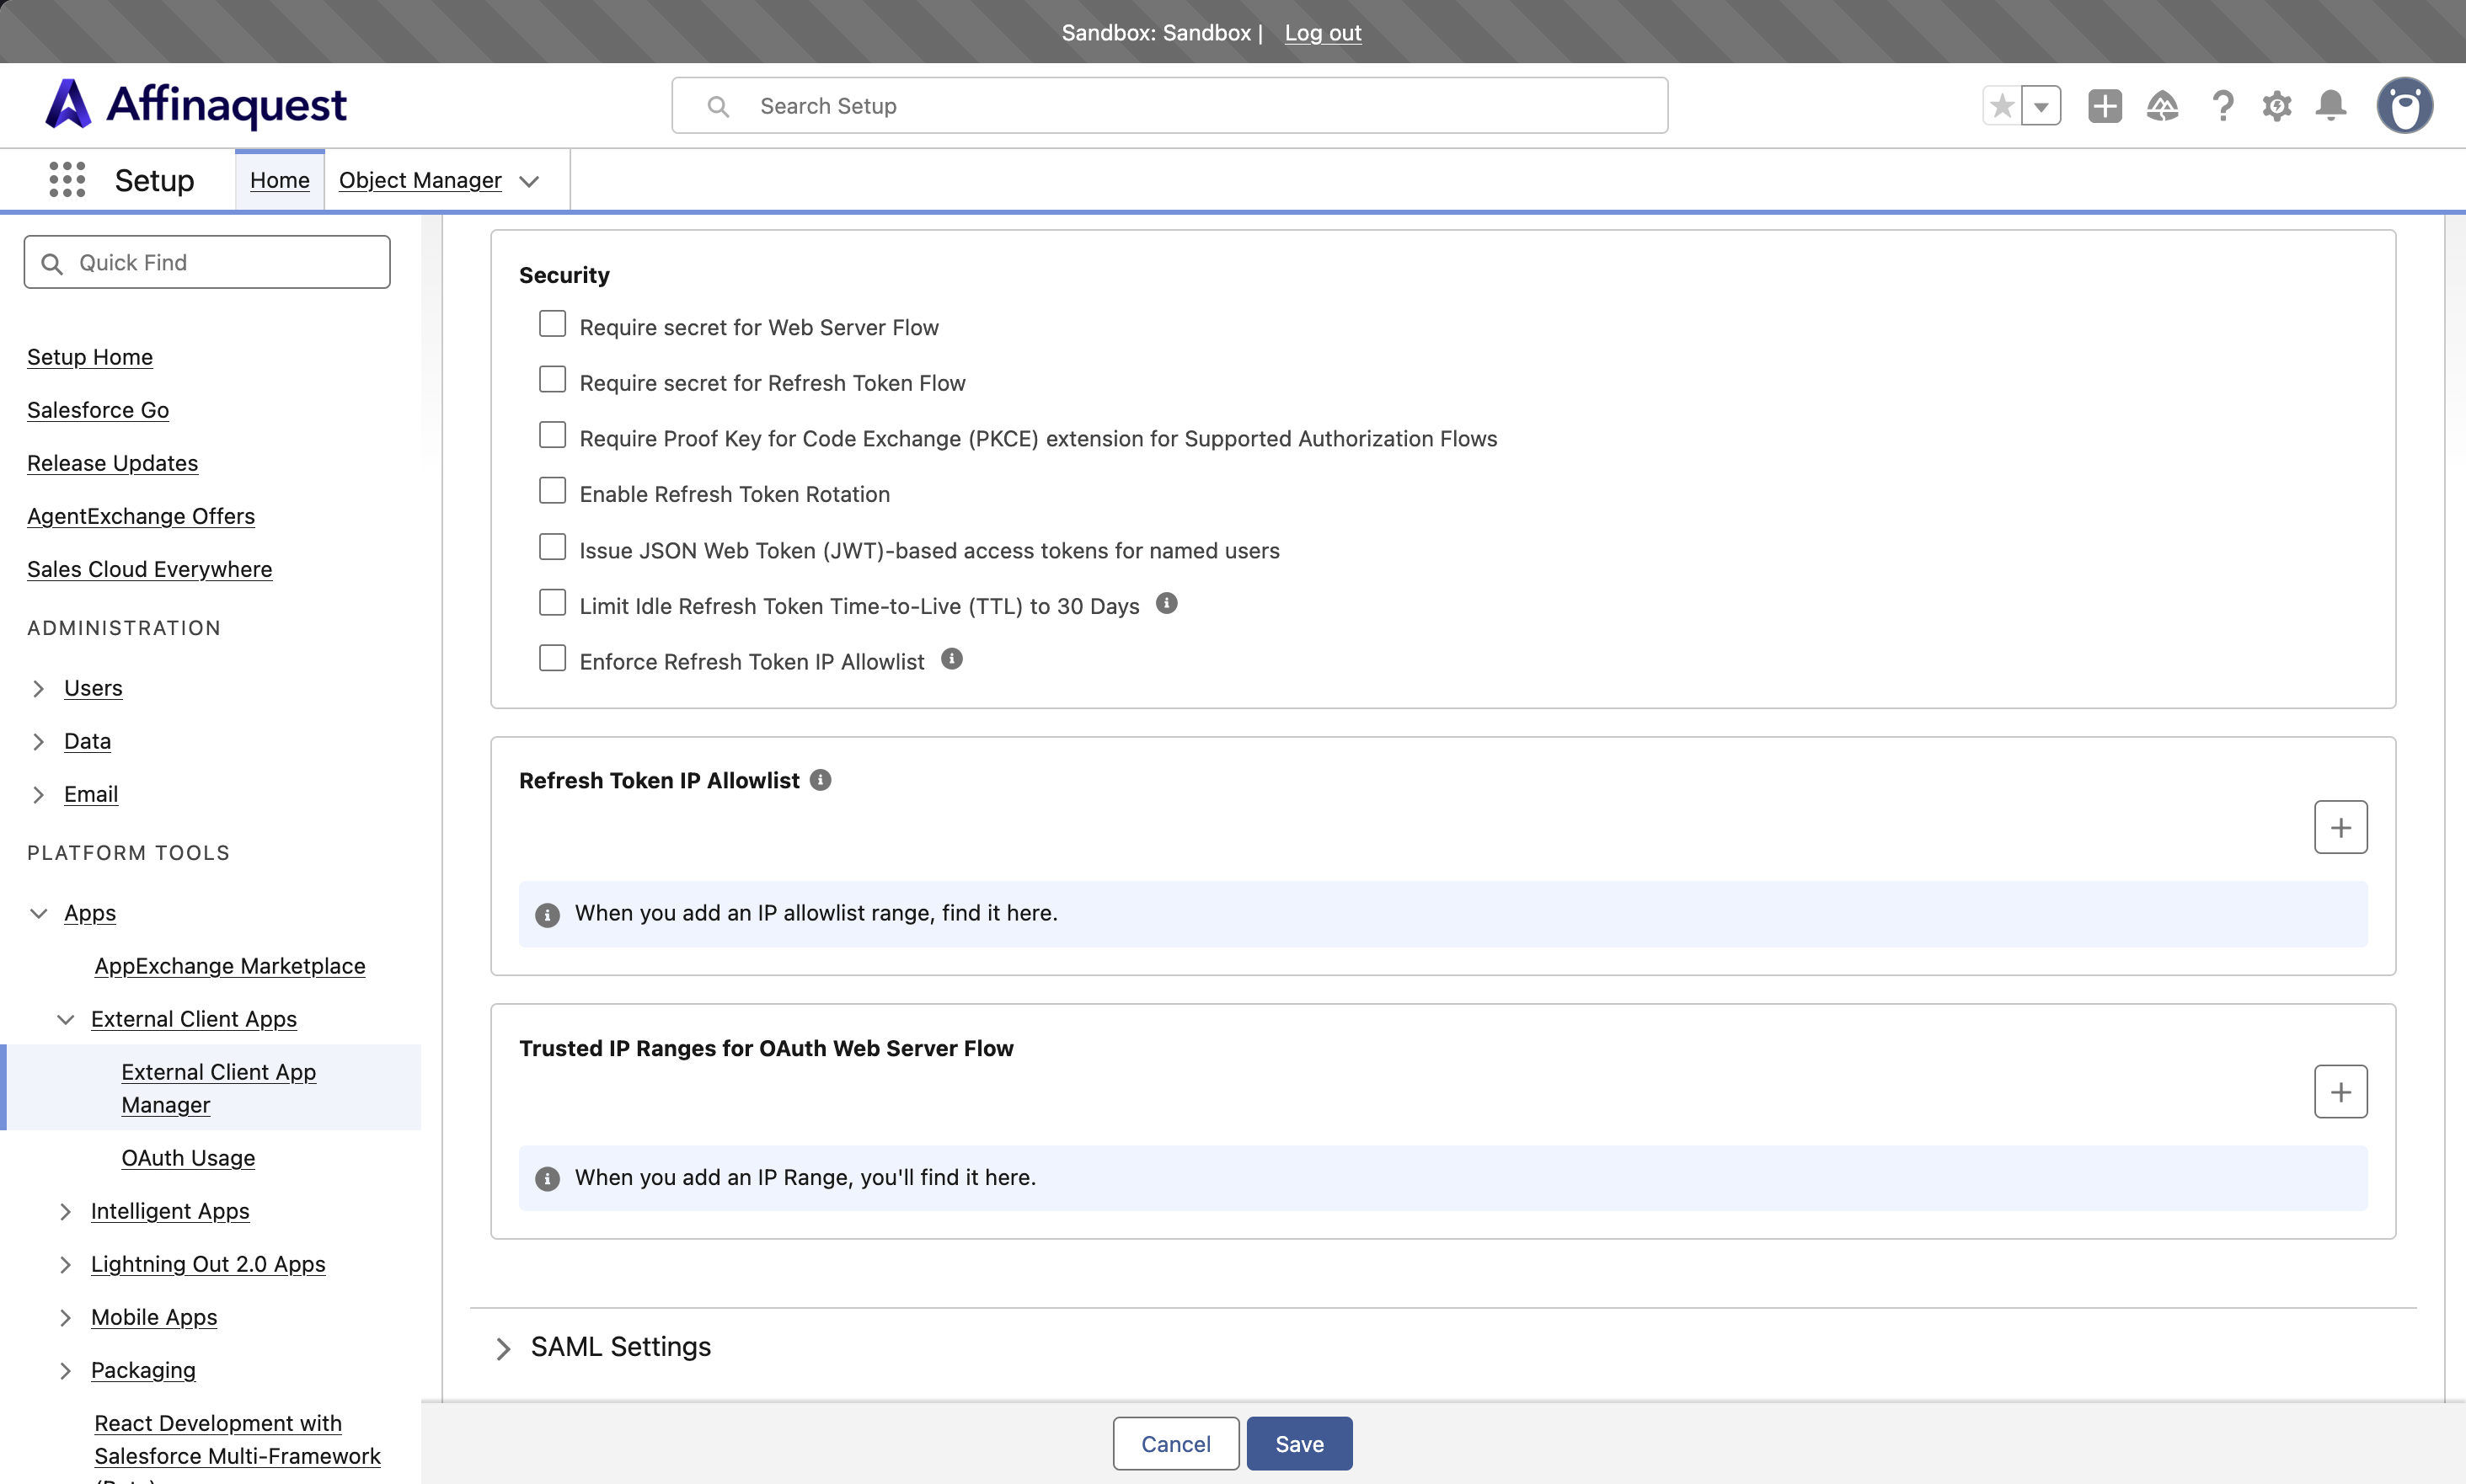
The two last checkboxes, 'Limit Idle Refresh Token Time-to-Live (TTL) to 30 Days' and 'Enforce Refresh Token IP Allowlist', can be checked to add additional layers of security to Refresh Tokens. Once again, the flow used by the proof of concept does not need Refresh Tokens, so this setting was not enabled. For the setting related to the first checkbox, more information can be found here. For the setting related to the second checkbox, see the section below.
Refresh Token IP Allowlist
This subsection can be used to improve the security of the External Client App. With the '+' button located on the right, IP address ranges can be added to the list. Once the 'Enforce Refresh Token IP Allowlist' checkbox has been checked (see previous section), only the IP addresses comprised within the ranges in the list can request tokens to the Authorization Server by using the Authorization Code/Web Server flow or the Request Token flow. The IP addresses that are not explicitly allowed will be blocked from receiving any token. As the flow used by the proof of concept does not need Refresh Tokens, the list in this subsection was left empty.
Trusted IP Ranges for OAuth Web Server Flow
This subsection is similar to the previous one. With the '+' button located on the right, IP address ranges can be added to the list. Once at least one range has been added, all the IP addresses that are not comprised within the ranges in the list require verification in order to request tokens using the Authorization Code/Web Server flow. As the proof of concept does not use this flow, the list in this subsection was left empty.
Configuring OAuth policies
The section to configure OAuth policies contains several subsections.
Plugin Policies
This subsection is the most important because it defines what users within the Salesforce org (Resource Owners) are permitted to use OAuth in order to authorize the external application (Client) to access their data through the External Client App. In the 'Permitted Users' drop-down menu, there are only two options: 'All users can self-authorize' and 'Admin approved users are pre-authorized'. When the first option is selected, all the users within the Salesforce org are permitted to use OAuth. Selecting this option implies that the users must be able to interact with the external application in order to complete the authorization process. For the server-to-server integrations, where there is no user interaction, the second option must be selected. With this option, the administrator of the External Client App can choose which users are pre-authorized. After a user is chosen, the External Client App will automatically authorize the external application to access their data—they do not have to do anything. The pre-authorized users can be selected in the 'App Policies' section, which is presented below. As the integration built for the proof of concept is a server-to-server integration, the second option was selected.
Next to the the 'Permitted Users' drop-down is a text area labelled 'OAuth Start URL'. This is only available when the start page of the External Client App is set to 'OAuth' in the 'App Policies' section—by default, it should be grayed out. More information is given in the next section.
'Custom Scopes' and 'Apex Plugin Class' are additional policies that were not needed for the proof of concept and that will not be needed for the rest of the project, so they are not explained in this documentation.
OAuth Flows and External Client App Enhancements
This subsection is used to configure the policies of two specific OAuth flows: Client Credentials and Token Exchange. When these flows are not selected, this subsection is empty. When the Token Exchange flow is selected, a simple checkbox labelled 'Enable Token Exchange Flow' appears, which can be checked, as its label implies, to enable the Token Exchange flow. When the Client Credentials flow is selected, another checkbox appears, labelled 'Enable Client Credentials Flow', which can be checked, like the previous one, to enable the Client Credentials flow. After it is checked, a text area labelled 'Run As (Username)' appears underneath. As explained previously, with the Client Credentials flow, the external application (Client) always accesses the data of the same user (Resource Owner). In the text area, the email address of that user must be entered.
The policies set in the 'Plugin Policies' subsection regarding permitted users and in the 'App Policies' section do not apply to the Client Credentials flow. If this is the only flow enabled for an External Client App, there is no need to configure them.
App Authorization
In this subsection, additional settings for the External Client App can be configured—most of them are related to Refresh Tokens. As the proof of concept does not use the Refresh Token flow, these settings were left as default. The remaining settings in this subsection were not needed for the proof of concept and will not be needed for the rest of the project, so they were also left as default.
Custom Attributes
This subsection can be used to add custom attributes to the External Client App, which can be used to 'transfer data that's unavailable in the OAuth exchange' to the external application (Client). No custom attribute was needed for the proof of concept, but if it becomes necessary in the future for the requirements or needs of the project, more information can be found here.
Configuring App policies
As mentioned previously, once the 'Permitted Users' setting has been set to 'Admin approved users are pre-authorized' in the OAuth policies, the pre-authorized users can be selected by the administrator in the section to configure App policies. This is the main purpose of this section.
The administrator of the External Client App cannot pre-authorize users by individually selecting them. Instead, they have to select Profiles or Permissions Sets. A profile is a set of settings and permissions which can be assigned to a user. Every Salesforce org includes predefined standard profiles, such as 'System Administrator' or 'Standard User', and can also define their own customized profiles. Permissions sets are the recommended way to extend users' permissions without changing their assigned profiles.
There are four lists in the App policies section: two under the label 'Select Profiles' and two under the label 'Select Permission Sets'. The two lists on the left, labelled 'Available Profiles' and 'Available Permission Sets', contain all the profiles and permission sets available in the Salesforce org. By using the arrows, these profiles and permission sets can be moved from one list to another. Once a profile/permission set has been moved to the list labelled 'Selected Profiles'/'Selected Permission Sets', all the users within the Salesforce org which were assigned this profile/permission set are pre-authorized for the External Client App.
Above the lists, a drop-down menu labelled 'Start Page' can be found. By default, it should be set to 'None'. There are two other options: 'Custom' and 'OAuth'. When 'Custom' is selected, the start URL must be entered in the text area labelled "???", which appeared to the right of the drop-down menu. When 'OAuth' is selected, the start URL must be entered in the text area labelled 'OAuth Start URL', located in the OAuth policies section. According to the Salesforce documentation on this topic, "a start URL defines the page where users end up when they run an External Client App". Once a start URL is entered, the External Client App appears in the App Manager. This setting is useful when the external application (Client) relying on the External Client App to interact with data on the Salesforce org has a user interface and/or uses the Authorization Code flow. When a user clicks on the External Client App in the App Manager, they are directed to the page located at the start URL; it can be any page of the external application's interface or, if the 'OAuth' option was selected, the page on which the user can initiate the OAuth authorization process. There is no user interface for the proof of concept and there will not be one for the rest of the project either. As a result, this setting was left on 'None'.
For the 'OAuth' option of the 'Start Page' setting, it is important to note that the start URL is not the same as the callback URL, defined in the OAuth settings. The start URL is the page on which users can initiate the OAuth authorization process; the callback URL is the page on which they are redirected once Salesforce (the Authorization Server) has authorized them.
In Salesforce, a user that wants to configure the App policies and manage the permitted users of External Client Apps needs to have a profile with the appropriate permission: 'Manage Profiles and Permission Sets'. This permission can be granted to a profile by an administrator in the 'System Permissions' of the profile (in the 'Users' section, at the bottom of the page), which can be found in the 'Setup' section, under 'Administration' > 'Users' > 'Profiles'.
To make the External Client App as secure as possible, it is important to follow the principle of least privilege. For server-to-server integrations, such as the one built for this project, the option 'Admin approved users are pre-authorized' must be selected and a dedicated user should be created. This user should also have a dedicated profile, which should only contain the settings and permissions that the external application absolutely needs to function properly. To start building this dedicated profile, a good practice is to first clone an existing profile with restricted access, such as 'Minimum Access - API Only Integrations'. The dedicated user should be the only one to have this profile, to make sure that no other user will be accidentally pre-authorized in the App policies section. This is why it is better to clone 'Minimum Access - API Only Integrations', create a dedicated profile based on it and select that profile in the App policies section rather than directly selecting 'Minimum Access - API Only Integrations', which could have been assigned to multiple users. This Salesforce blog page gives more details on how to make External Client Apps secure.
Connecting an Apache Airflow environment to a Salesforce External Client App
Once an External Client App has been created and configured on Salesforce, connecting an Apache Airflow environment to that app is relatively straightforward. However, before this connection can be established, the Salesforce provider needs to be installed in the Airflow environment.
Installing the Salesforce provider in the Airflow environment
A provider is a package that can be installed in an Airflow environment to extend its capabilities.
Providers can contain operators, hooks, sensors, and transfer operators to communicate with a multitude of external systems, but they can also extend Airflow core with new capabilities.
Editing the requirements file
To install the Salesforce provider, the following lines need to be added to the requirements file of the environment:
apache-airflow-providers-salesforce>=5.1.0
simple-salesforce>=1.0.0
The first line corresponds to the provider package, and the second corresponds to a PIP package called simple-salesforce, which the provider depends on. Although the provider has several other package dependencies, only simple-salesforce needs to be explicitly listed in the requirements file.
At the end of each line, the version of the package to be installed can be specified. This is not mandatory but highly recommended to prevent errors and ensure compatibility across all providers and the Airflow environment. The version of each package can be strictly enforced by using a double equal sign (==). However, it is recommended to only enforce the oldest version that can be installed by using the greater than or equal sign (>=)—this way, a newer version will be automatically installed if available.
The version of the provider depends on the latest release available as well as the version of Apache Airflow being used. The version of the simple-salesforce package must satisfy the requirements of the provider.
As a reminder, the requirements file is located in the S3 bucket linked to the Airflow environment for MWAA, and in the requirements folder at the root of the aws-mwaa-local-runner directory (which was cloned from the GitHub repository) for the local runner.
Updating the Airflow environment
Once the requirements file has been edited, the Airflow environment must be updated in order for the provider and its dependencies to be installed. The process to update an environment in MWAA is described in this section of the page "Setting up Apache Airflow", and the process to update an environment in the local runner is described in this section of the same page.
When updating an MWAA environment, in the DAG Code in Amazon S3 section, if the configuration is set to a specific version of the requirements file, the newly edited version must be explicitly selected, otherwise the requirements will remain unchanged. If no specific version is selected (the drop-down list still displays Choose a version), nothing needs to be done, as the latest version of the requirements file will be selected automatically.