
Salesforce DAGs
Overview
The DAGs produced in this section were some of the first DAGs made during the internship. The DAGs here are made for Contact objects and Account objects, which are native to Salesforce. The DAGs originally were made during May-June of 2026 and intended for use in the Sandbox environment which only used test data. As of July 31st, 2026, the DAGs are being refit to function in a production environment.
TODO: LINK HERE
All of the code can be accessed in AWS and as well in the GitHub repository.
The general structure of each DAG is the following, each DAG follows an "ETL" or Extract, Transfer, Load design. Since PostgreSQL was chosen as one of the endpoints during the internship, data is fed between PostgreSQL or Salesforce and then fed into the intermediary service of Airflow. In Airflow, the data is "transformed" in whatever manner is necessary, and then is fed to the other service. If data was taken from PostgreSQL, then it would typically flow back out to Salesforce, and if data was taken from Salesforce it would generally go back to PostgreSQL.
Many of the DAGs contain their own respective documentation, however additional documentation is added here such that they can be understood at a higher level and more context can be given with respect to their uses in Salesforce.
Visual Studio Code AWS Extension
The Visual Studio Code (VSC) extension for AWS makes modifying and creating existing DAGs extremely simple. The utility allows users to create, delete, upload, and modify files in AWS' file hierarchy as if it were a normal file explorer in VSC. For example consider the current working directory for DAGs:
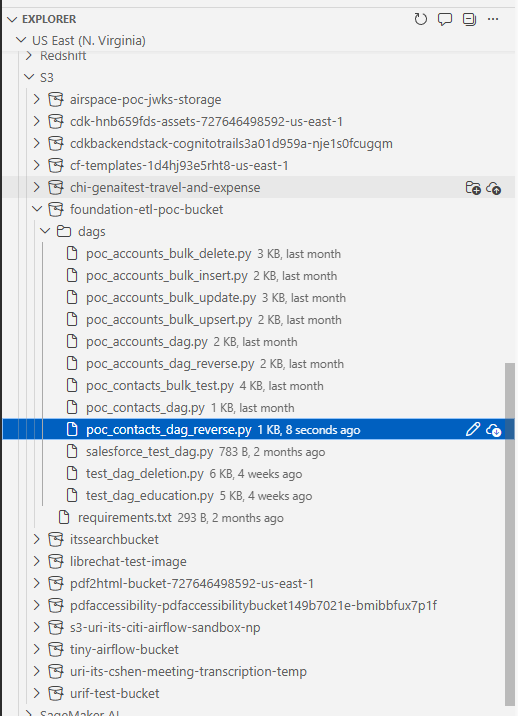
More information about the plugin can be found here. Installing the plugin in VSC and working with it is relatively simple. In VSC, the extension can easily be found by searching "AWS" into the extension marketplace. The top result "AWS Toolkit" should be installed.
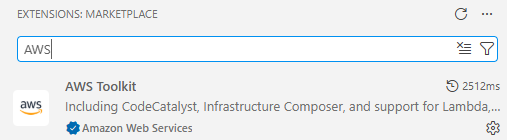
Once installed, there will appear an "AWS" icon on the bottom left sidebar of VSC. Click on it.
In order to sign in once the sign in process is configured, begin by heading into myapps in URI's SSO and select AWS. Next, on the bottom left hand corner of VSC there will appear a red bar. Click on that bar.
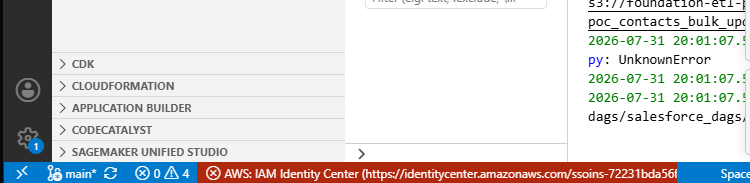
After clicking on the bar, a menu will bring up the option to access "IAM Identity Center", click on it. This will bring up a dialogue box with the option to open a link to AWS which will verify your credentials and permit you access to AWS' services through VSC again.
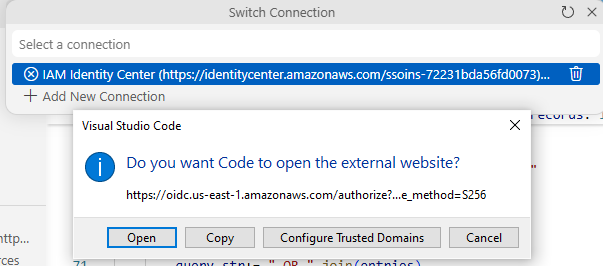
Once the site has been correctly accessed, the following screen will appear, which will allow the user to close it and return to VSC.
Then, click IAM Identity Center again. If you have the corresponding permissions for AWS, then you should be able to hit AWS Full Permission, which at least should give you full access to AWS. Note that you will not be able to run Airflow inside this environment, merely modify files, delete them, and upload files in AWS from your VSC environment.
I have opted for the following file hierarchy for the Airflow environment (this will not change how it is viewed and accessed from inside Airflow) since it separates DAGs into their respective functions quite well:
S3 bucket (foundational-etl-poc-bucket)
|___ requirements.txt
|___ dags/
        |___ create_tables/
		|___ salesforce_dags/
                      |___ account_dags/
                      |___ contact_dags/
		|___ affinaquest_dags/
    		|___ education_dags/
Bulk API
In Salesforce, there are four primary bulk operations, insertion, deletion, hard delete, updating, and upserting (update+inserting). Insertion adds a new entry to salesforce given some relevant fields about the object.
An object hard deleted in Salesforce is immediately deleted, whereas an object which is deleted in Salesforce lingers in the recycle bin for 15 days.
Airflow has bulk methods which make insertion and deletion of massive amounts of records efficient. I opted to use Simple Salesforce, which also has bulk operators that can be used in Airflow as well. For Further information on Bulk APIs in Simple Salesforce can be found here:
https://github.com/simple-salesforce/simple-salesforce
Rather than adding 50 objects individually, many are added at the same time. Each object in Salesforce has bulk methods. The bulk methods are all essentially identical in how they operate.
Test Connection DAG
This DAG simply tests that there is an existing Airflow connection and is entitled "salesforce_test_dag". This DAG is useful since it simply reads from Salesforce, which proves that Salesforce is connected without making any unexpected modifications to it or PostgreSQL. In the event that a connection must be re-established between Airflow and Salesforce, this DAG can be used to test that the connection is valid safely.
The DAG does not follow the ETL structure as it is just used to verify that a connection exists.
from datetime import datetime
from airflow.decorators import dag, task
from airflow.providers.salesforce.hooks.salesforce import SalesforceHook

@dag(
    dag_id="salesforce_test_dag",
    schedule=None,
    start_date=datetime(2026, 1, 1),
    catchup=False,
)
def salesforce_test_dag():

    @task
    def test_connection():
        hook = SalesforceHook()

        # Test with a simple query
        result = hook.make_query("SELECT Id, Name FROM Account LIMIT 5")

        print(f"Successfully connected to Salesforce!")
        print(f"Retrieved {len(result['records'])} accounts")

        for record in result["records"]:
            print(f"  - {record['Name']}")

        return result["records"]

    test_connection()

salesforce_test_dag()=6.3.0
Create Table DAGs
These aren't much DAGs as much as they are files inside Airflow which are run following executions of DAGs for the corresponding objects. The Contact object has an associated PostgreSQL table for extracting information, and for loading in Contact info from salesforce. These tables are respectively known as "contact_extract" and "contact_load" For the Accounts object there is a similar associated "account_extract" and "account_load" table in PostgreSQL.
Contact DAGs
Contact objects in Salesforce represent an individual associated with a business account, and as the name would suggest, contains that person's name, phone number, email address, and other useful fields by which that person can be contacted.
Currently the only fields supported in the Contact DAGs are, "FirstName", "LastName", "Email", and "MobilePhone". All of these fields are self explanatory. By default, every object in Salesforce has its own unique ID, which is unique to each object. There is no strict uniqueness on any of these fields, and duplicate objects with the exact same fields can exist for Contacts.
An object's ID can be obtained via a SOQL query. SOQL is Saleforce's Query Language, which is similar to SQL in many respects but with notable differences such as lacking any wildcard operator ( the symbol "*", for instance in the query "SELECT * From Contacts" to select all fields from Contacts ). It is thus necessary to determine the identity of an object by writing queries which will select fields that should be unique in general, like a phone number or an email, or to match as many fields as possible against the objects.
Using a single field like a phone number or email has the benefit of making a much more readable and plain query to work with, whereas using all fields makes selection of elements much quicker and queries easier to write. Due to general limitations on the size of queries in SOQL of 100,000 characters, and for more readable queries, I opted to only select the emails of each test account.
There are some DAGs which do not make use of Bulk. Most of these DAGs are not practical and were made to show that code could be successfully executed in Airflow. The relevant DAGs at this time are "poc_contacts_bulk_delete","poc_contacts_bulk_insert", "poc_contacts_bulk_update", "poc_contacts_bulk_upsert", and "poc_contacts_dag_reverse".
PostgreSQL For Contacts
There are two tables in the "mock_snowflake" PostgreSQL database for Contacts, namely a "contacts_extract" table for DAGs which begin in PostgreSQL and move data into Salesforce, and a "contacts_load" for DAGs which start in Salesforce and end in PostgreSQL. The queries used to write these tables are respectively, and are executed in Airflow from the "build_contacts_tables" DAG.
CREATE TABLE contacts_extract (
        FirstName VARCHAR(255),
        LastName VARCHAR(255),
        Email VARCHAR(255),
        MobilePhone VARCHAR(20)
        );
CREATE TABLE contacts_load (
FirstName VARCHAR(255),
LastName VARCHAR(255),
Email VARCHAR(255),
MobilePhone VARCHAR(20)
);Here is the resulting data for "contacts_extract" after it has been created:
snowflake_mock=# SELECT * FROM contacts_extract;
  firstname   |  lastname   |    email    |   mobilephone
--------------+-------------+-------------+-----------------
 1_First_Name | 1_Last_Name | 1@gmail.com | +1-111-111-1111
 2_First_Name | 2_Last_Name | 2@gmail.com | +2-222-222-2222
 3_First_Name | 3_Last_Name | 3@gmail.com | +3-333-333-3333
 4_First_Name | 4_Last_Name | 4@gmail.com | +4-444-444-4444
(4 rows)
snowflake_mock=# SELECT * FROM contacts_load;
firstname | lastname | email | mobilephone
-----------+----------+-------+-------------
(0 rows)In order to reset both tables, run the "build_contacts_tables" DAG. It will drop either of the tables if detected, and reconstruct both tables with the above associated fields. Secondly, it will add in the default information into "contacts_extract".
When working with the Upsert, Update, and Delete DAGs, it is important to note that in order to modify or remove an existing entry from Salesforce, there needs to be a way to identify a corresponding entry/entries that can be changed.
Bulk Contact Upsert DAG
Bulk Contact Update DAG
Bulk Contact Delete DAG
Testing All Contact DAGs
In order to verify that all of the Contact DAGs are working, it is recommended that the DAGs are run in a specific order. Make sure that you know how to find and access these records in the frontend of Salesforce. It is vital that the records added to Salesforce are visible.
Begin with the "build_contacts_tables" table in order to reset the PostgreSQL table for loading and extracting. Secondly, run the "poc_contacts_bulk_insert" DAG. This will populate Salesforce with entries from the PostgreSQL load table. Secondly, run the "poc_contacts_bulk_update" DAG, this will change each DAG to have a different name indicating they were updated by this function. Thirdly, run "poc_contacts_bulk_upsert" which will add 4 entries to Salesforce and then modify the 4 existing entries. Fourthly, run "poc_contacts_reverse". Check the PostgreSQL database in the "contacts_load" page, it should include 5 different records that may or may not include the newly added information. Lastly, run the "poc_contacts_bulk_delete" DAG, which will remove all of the entries added during this test.